
Meet the never-lets-you-down, basic-done-better recipe everyone needs: How to Bake Chicken Breast! Juicy enough to enjoy on its own, yet versatile enough to add to your favorite salads, sandwiches, and more, this is my go-to method for perfect, tender chicken every time, plus seasoning variations.
When it comes to the Popular Protein Awards, you can’t beat boneless, skinless chicken breasts.
- They’re easy to find, endlessly useful, and one of the most approved proteins by picky eaters.
- Low in calories, high in protein, and with zero carbohydrates and saturated fat, you can’t deny that chicken breast is very healthy. It is a wholesome addition to a balanced diet.
- You can season chicken any which way to suit the way you’ll be using it, or your fancy.

Why Chicken Breast Can Be Dry
While chicken breast is great in theory—a lean protein I can flavor anyway I like, enjoy on its own, or add to pastas, salads, casseroles, sandwiches, and more, AND it’s good for me?!—too often, chicken breast is a total fail in execution.
Dry. Bland. Rubbery. All are common outcomes of baked boneless chicken breast.
Chicken breast is a lean cut of meat with little to protect it from becoming dry.
A simple boneless breast takes a little more love.
Here’s what you need to know to make the best juicy chicken breast.

After testing various methods, I’ve unlocked a simple method to bake your chicken breast without drying it out.
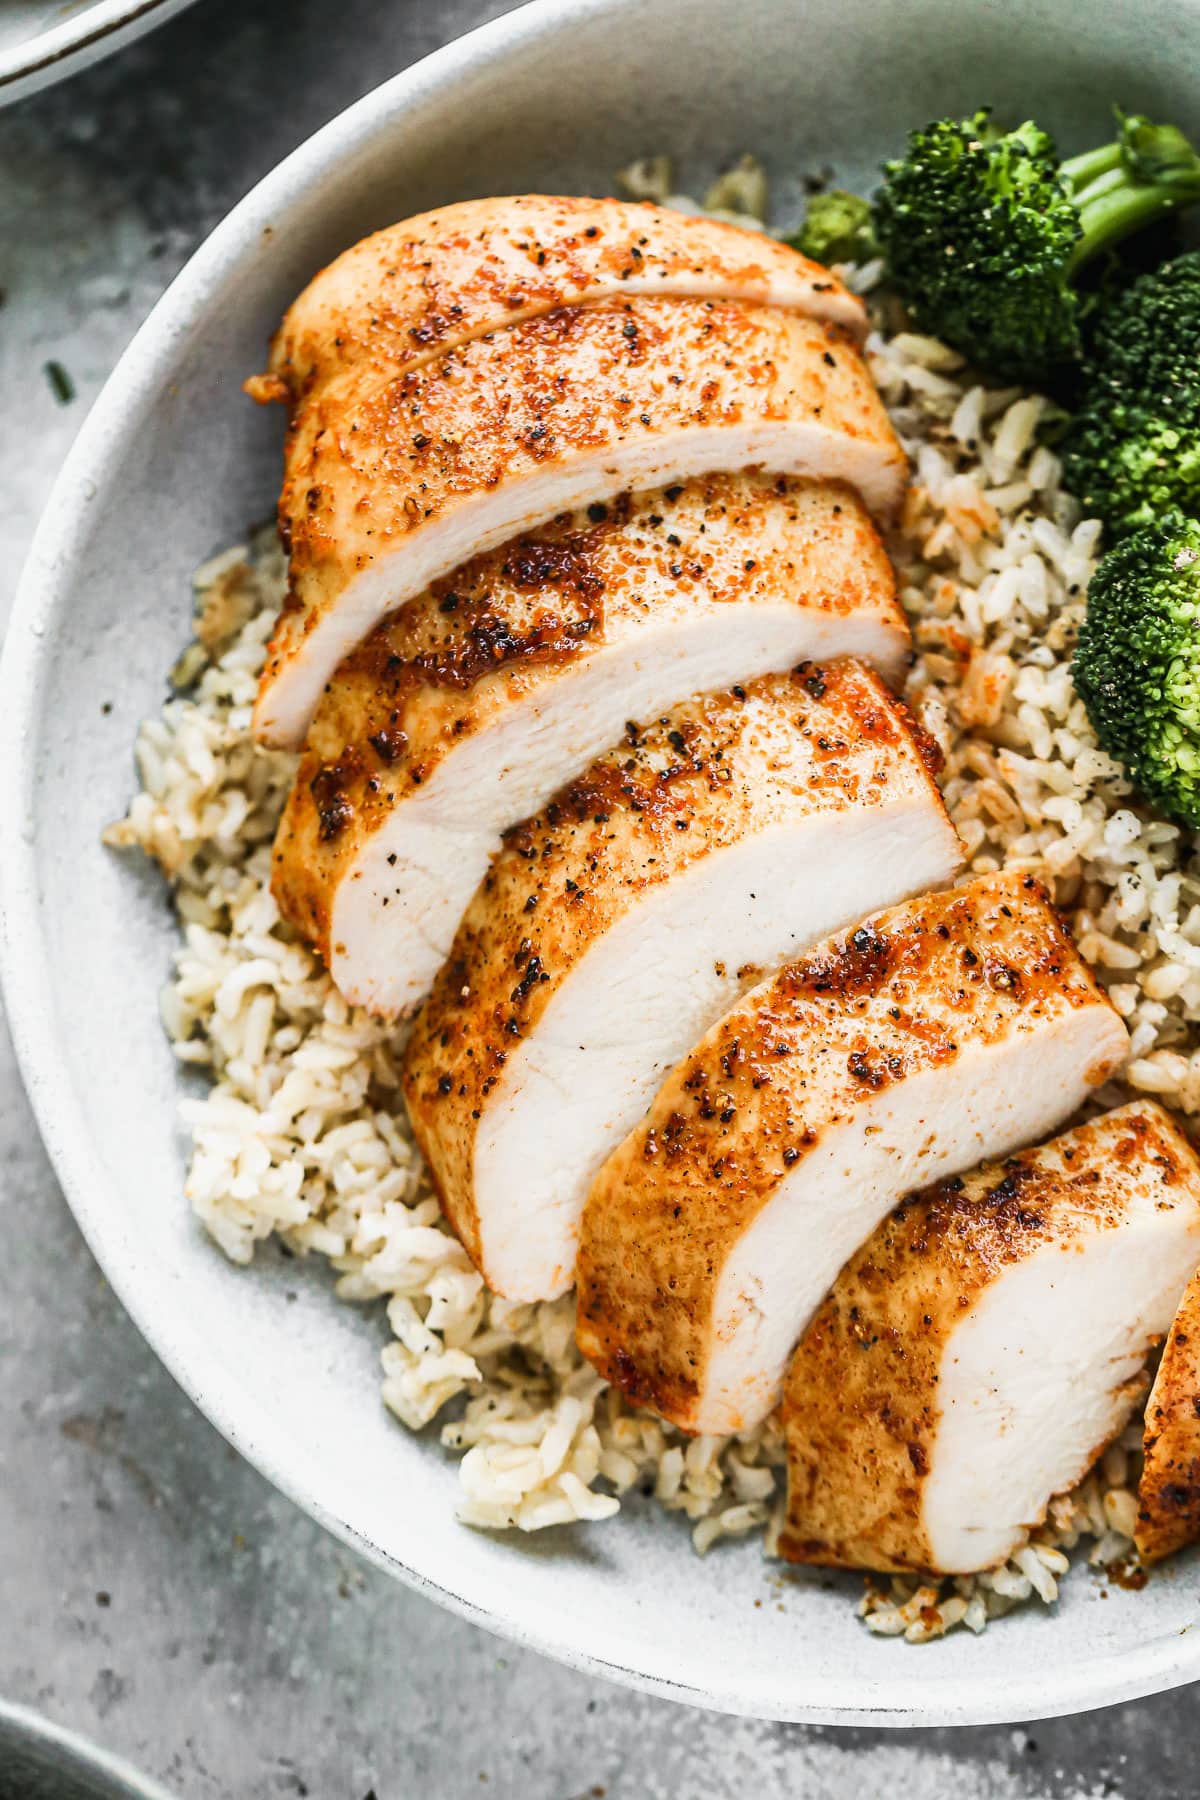
Like my Grilled Chicken Breast, this chicken breast is succulently juicy, golden on the outside, and ready to add to any of your favorite recipes.
One of the things I love most about it, however, is that it truly tastes good enough to stand on its own as a main, a rarity among most simple chicken breast recipes.
How to Bake Chicken Breasts
1. Pound
Chicken breasts are usually thinner on the ends and thicker in the middle, which means that by the time the chicken is cooked through at its center, the ends are rubbery and dry.
- Lightly pound your chicken to an even thickness so that it all cooks in the same amount of time.
- As a bonus, your recipe will finish up more quickly and pounding can help make the meat more tender.
2. Brine
Brining isn’t just for turkey!
- Salting your chicken by a wet brine or dry brine method for as few as 15 minutes will enhance its taste significantly.
- A brine works wonders for its inner juiciness and ensures that the meat is seasoned all the way through, not just on the outside.
Why Brine?
Brining has a scientific effect on meat. It changes the protein structure in a way that improves its texture and helps it to hold water so that it is juicier (you can read more about how brining works here).
As far as HOW to brine, you have two options:
- a wet brine (in which the meat is submerged in a saltwater solution or something like this delicious Chicken Marinade or Turkey Brine), or
- a dry brine (in which the meat is seasoned generously with salt and rests uncovered for a period of time; see this Dry Brine Turkey for another option; it works with chicken too!).
Both the wet brine and the dry brine have their pros and cons.
I tested this baked chicken breast with both brines to see which was best.
Here’s a side by side of the results:

Wet vs. Dry Brined Chicken Breasts
- Wet Brine
- Pros. Short brining time. Just 15 minutes yielded fantastic results. Chicken retained more moisture.
- Cons. Messy. I don’t love having my chicken sitting in a bowl of water. Wet brining takes up more space. You need to rinse the chicken after it is brined which is messy and has a slightly higher contamination risk (or you can skip the rinse and embrace having salty chicken, which isn’t necessarily a bad thing).
- RESULT. Some of the juiciest chicken I’ve ever tasted. It was plumper than the dry brine, though I can’t say one was more tender than the other.
- Dry Brine
- Pros. Neater and easier compared to the wet brine method. You do not need to rinse the meat after dry brining; simply brush off the excess salt.
- Cons. Longer brining time (30 minutes) compared to wet (15 minutes). Slightly less juicy chicken compared to wet.
- RESULT. The chicken was firmer and less plump than the wet brined chicken, but not in a bad way. It was still incredibly tender and much, much better than chicken breasts that are not brined.
Still deciding? Check out these close ups.
Wet Brined Baked Chicken Breast:

Dry Brined Baked Chicken Breast:

Honestly, I was super happy with both the wet brined and dry brined chicken.
I would use either method, depending upon how pressed for time I am.
Tip!
If your chicken breast comes pre-brined, skip the brining step or it will be too salty.

3. Let Chicken Come to Room Temperature
While you can leave your chicken in the refrigerator to brine, don’t throw it into the oven cold right out of the refrigerator. If you do, it will not cook evenly. By the time the middle cooks through, the outsides will be dry.
- Let your chicken rest at room temperature for at least 10 minutes before baking.
4. Bake Chicken Breast at 425 Degrees F
I’ve tested how long to bake chicken breasts at 350, at 400, at 425, and at 450.
- Based on my tests, the best temperature to bake chicken breasts is 425 degrees F.
At this temperature, the chicken turned golden on the outside and unbelievably juicy inside. If you go lower, the chicken can dry out, as it will need to be in the oven for a longer period.
5. Get the Right Internal Temperature
To make sure you do not overcook your chicken, use an instant read meat thermometer.
- An instant read thermometer is the absolute best way to know when your chicken breast is done. It will make sure you do not overcook your chicken, fish, and other meats. I even use it to tell when my banana bread is done (195 degrees F)!
- Be sure to insert the meat thermometer at the thickest part of the chicken.
- Per the FDA, chicken breast is considered safe to eat at 165 degrees F.
- Since the chicken’s temperature will rise as it rests, I remove mine between 155 degrees F and 160 degrees F. I have never had a problem with uncooked meat.
6. Let the Chicken Rest
This is non-negotiable for juicy chicken breast.
- Resting meat allows the juices to reincorporate back into the meat. If you cut the chicken right away, all that juiciness you worked for will slip right out.
- For boneless, skinless chicken breasts, 5 minutes of resting time is sufficient, though you can go up to 10 if you like.
Step-by-Step: How to Bake Chicken Breasts

- Pound the chicken.

- Pat the chicken dry.

- For a dry brine: salt the chicken and refrigerate it.

- For a wet brine: mix warm water and salt together in a bowl. Add the chicken. Let rest 15 minutes at room temperature or refrigerate it for up to 4 hours.
- Let the chicken come to room temperature. Rinse or wipe off the brine.

- Toss the chicken with oil and spices, then lay it in a casserole dish. For easy clean up, you can line the dish with foil or parchment paper.

- Bake at 425 degrees F. See the suggested cooking time in the recipe card below.

- Let the chicken rest for at least 5 minutes. DIG IN!

Ways to Season Baked Chicken Breast
Once your chicken is brined, you can bake it right away, or add any seasonings you like.
If using a blend of seasonings, stir them together in a small bowl, then scatter them over the chicken. Here are a few ideas to get you started.
- Paprika. A delicious, sweet spice. For a hint of heat, use smoked paprika.
- Garlic Powder. Garlicky goodness!
- Onion Powder. Tasty in combination with garlic powder.
- Salt and Pepper. Classic and beloved.
- Red Pepper Flakes. For a little heat.
- Sweet and Spicy. Combine brown sugar with spicier ingredients like chili powder, cumin, and cayenne pepper.
- Lemon Pepper. Always a crowd-pleaser. Most lemon pepper seasoning includes some salt, so adjust accordingly.
- Everything Bagel Seasoning. Add the popular seasoning blend to your chicken.
- Cajun Seasoning. Bold and a little spicy. Most cajun seasoning includes some salt, so adjust accordingly.
- Taco Seasoning. Perfect for making chicken tacos or a Chicken Quesadilla.
- Italian Seasoning. Scrumptious for Italian-style recipes.
- Herbs. Oregano, thyme, and rosemary all work well with chicken. For an easy blend, use Italian seasoning or herbs de Provence.
- Curry Powder. Warm and wonderfully flavorful.
- Stuffed Chicken Breast. This elegant Spinach Stuffed Chicken Breast is a must-try recipe!
Ways to Use Chicken Breast
Once you have your juicy baked chicken breast, there are so many incredible ways to use and serve it it!
For easy use, you can dice or shred this baked chicken breast. (I suggest using a hand mixer to make shredding extra quick and simple.)
Baked Chicken Storage Tips
- To Store. Refrigerate chicken breast in an airtight container for up to 3 days.
- To Reheat. Gently rewarm chicken in a baking dish in the oven at 350 degrees F.
- To Freeze. Freeze leftovers in an airtight freezer-safe storage container for up to 3 months. Let thaw overnight in the refrigerator before reheating.


WHEW! There you have it. The download on making the best ever, juicy guaranteed, baked boneless skinless chicken breasts.
If you try this recipe, I’d love to hear how it turns out for you, and if you use the wet or the dry brine. Your comments make my day!
Frequently Asked Questions
Yes, this brine also tastes delicious with boneless, skinless chicken thighs. They will take 15 to 20 minutes at 425 degrees F. See this post for Baked Chicken Thighs for more tips.
I do not recommend baking frozen chicken breasts in a conventional oven, as the chicken may spend too long at an unsafe temperature. Make this Air Fryer Chicken Breast instead, since frozen chicken breast can be placed in an air fryer.
While the microwave can be used cautiously to thaw chicken breast, I do not recommend cooking chicken breast in a microwave. The outsides will be overcooked and the interior of the chicken will be rubbery. If you have a microwave that also functions as an oven, you can try baking your chicken breast in the microwave at 425 degrees F(or 400 degrees if using convection) for 12 to 20 minutes , depending upon the size of your breasts.
Chicken cutlets, which are chicken breasts that have been sliced in half horizontally to create two thinner pieces, bake more quickly than regular chicken breasts. Start checking them at the 8-minute mark.
Also, a fantastic option if you do not have time to brine but still crave quality flavor is my Pan Fried Chicken Breast.
Or if you want baked chicken but crave a crispy outside of panko breadcrumbs, definitely try my Chicken Katsu, which has the texture of being deep fried while being much healthier and doesn’t require brining!
Whether you are a new or experienced cook, it is just as easy to pan fry chicken breast as it is to bake it. See this Pan Fried Chicken Breast for a recipe. (If you are very nervous, I suggest starting with baking, since you don’t need to worry about keeping the pan at a certain temperature).
- 3 to 4 boneless, skinless chicken breasts (about 1 1/2 pounds)
- Wet or dry brine see below
- 2 to 4 teaspoons extra virgin olive oil 1 teaspoon per breast
- 1 teaspoon paprika*
- 1 teaspoon garlic powder*
- 1/2 teaspoon kosher salt add ONLY if rinsing the chicken, plus additional to taste
- 1/4 teaspoon ground black pepper*
- Additional seasonings of choice see blog post above for suggestions
-
Place chicken breasts on a cutting board and lay a large piece of plastic wrap over the top to guard against splatters. With a meat mallet or rolling pin, pound the breasts into an even thickness.
-
Pat the chicken breasts dry on both sides.
-
TO DRY BRINE: Sprinkle the breasts generously on both sides with salt. Place in the refrigerator uncovered for 30 minutes or up to 1 day.
-
TO WET BRINE: In a large bowl, stir together the warm water and salt. Place the chicken breasts in the water and let sit at room temperature for 15 minutes, or cover and refrigerate for up to 4 hours.
-
TO COOK: Preheat the oven to 425 degrees F. If the chicken is in the refrigerator, remove it. If dry brining, with a paper towel, wipe off the salt well from both sides (I do not rinse my dry brine). If wet brining, remove the chicken from the wet brine and rinse it off (to skip the rinse, omit any remaining salt from the recipe; your chicken will be salty but by no means inedible).
-
Pat the chicken very dry on both sides, wiping away any clearly visible salt. If the chicken has been in the refrigerator, let it sit at room temperature for 10 minutes.
-
Coat a ceramic or metal baking dish large enough to hold the chicken in a single layer (such as a 9×13-inch baking dish) with nonstick spray. (I do not recommend using glass/Pyrex, as the way it conducts heat will not cook the chicken as evenly. If needed, you can bake the chicken on a metal baking sheet.)
-
Place the chicken in a large bowl (if wet brining, rinse out, dry, and reuse the same bowl if you like). Add the olive oil, paprika, garlic powder, salt (only add the salt if you rinsed your chicken), and pepper. Toss to coat the chicken evenly, then arrange it in the baking dish.
-
Bake the chicken for 14 to 16 minutes (for small/medium breasts that are about 6 to 7 ounces), 16 to 20 minutes (for medium/large breasts that are 8 to 10 ounces), or 20 to 25 minutes (for larger breasts). For absolute best results, use an instant read thermometer. When the breasts reach 165 degrees F, they are done.
-
REST: Transfer the chicken to a plate or cutting board. Cover and let rest for a minimum of 5 minutes. Slice, dice, or shred as desired. Enjoy!
- *Feel free to swap out these seasonings for the suggestions in the blog post above.
- Debating between a wet and dry brine? See the blog post above for the pros and cons of each.
- If your chicken breast comes pre-brined (sometimes it is sold this way) skip the brining step.
- TO STORE: Refrigerate chicken breast in an airtight storage container for up to 3 days.
- TO REHEAT: Gently rewarm chicken in a baking dish in the oven at 350 degrees F.
- TO FREEZE: Freeze leftovers in an airtight freezer-safe storage container for up to 3 months. Let thaw overnight in the refrigerator before reheating.
Serving: 1(6-ounce) chicken breastCalories: 216kcalCarbohydrates: 1gProtein: 36gFat: 6gSaturated Fat: 1gTrans Fat: 1gCholesterol: 109mgPotassium: 651mgFiber: 1gSugar: 1gVitamin A: 298IUVitamin C: 2mgCalcium: 11mgIron: 1mg
Join today and start saving your favorite recipes
Create an account to easily save your favorite recipes and access FREE meal plans.
More Baked Chicken Breast Recipes
Love baked chicken? Here are a few more excellent baked chicken breast recipes.