I have a Christmas confession to make—I’ve never had a tree skirt before. I don’t mean I’ve never made a tree skirt, I mean I’ve never had one in general.
This year, I thought I’d jump on the tree skirt train and start with three easy no-sew options for my first year.
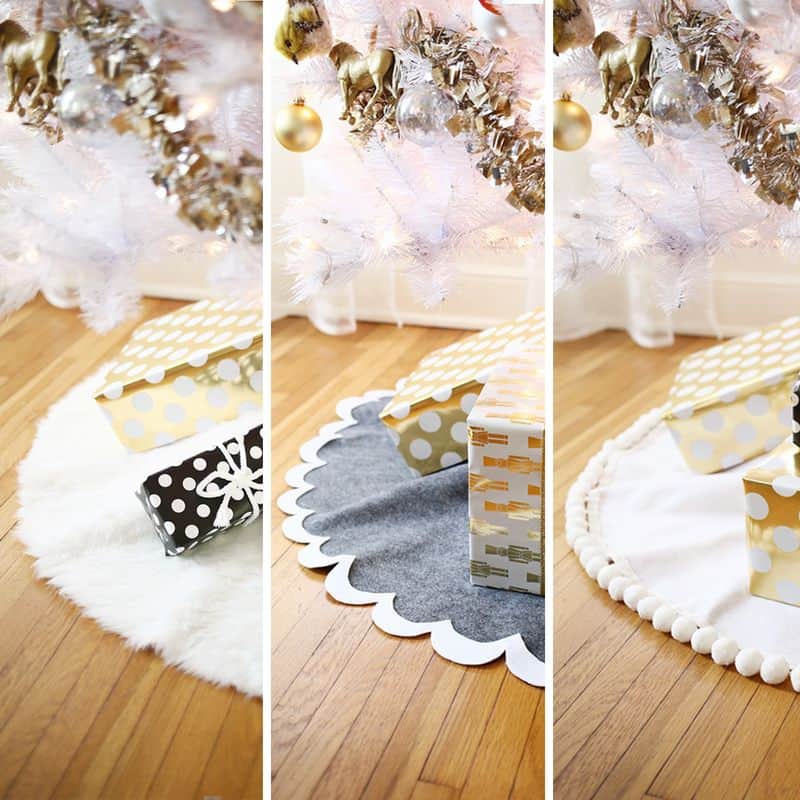
The good news is that these tree skirts really are so easy to make, but the bad news is that (unless you have three trees) you have to pick just one!
Related: No-Sew Glitter Star Tree Skirt DIY
")
-fabric (felt or faux fur in our case)
–hot glue gun
-matching ribbon
–fabric scissors
-ruler and marker
OK, here are the overall directions for your tree skirt. I’ll give you the variation details for each specific one below.
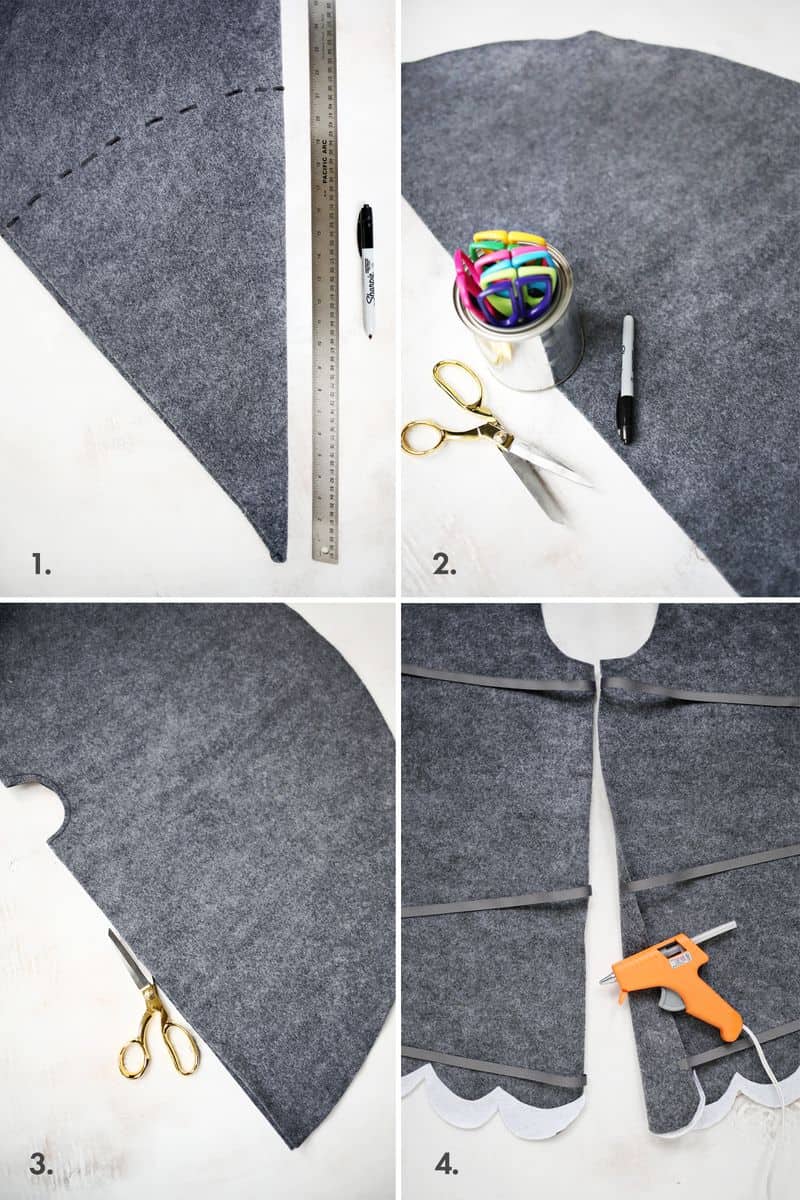
Step 1: First, we are going to cut a big circle out of our fabric. An easy way to get an even circle is to make a big square that is at least the width of your tree skirt (I have a small tree so I needed at least 40″ wide).
Fold the square in half to make a long rectangle (20″ x 40″), fold that rectangle in half at the middle vertical line (20″ x 20″).
When using thin fabric-like felt, you can even make another fold to make your square a triangle like I did in the first picture (the fur is a little too thick to do that many folds).
No matter how many times you fold your fabric, just use a ruler and measure out half your circle diameter (so 20″ for me) from the center of your folded square all the way across your folded fabric.
Cut through the layers across the marked line with fabric scissors, and you should have a circle when you unfold it.
Step 2: To make the small middle circle for your tree trunk, fold your fabric circle in half and place a round can or jar halfway across the middle point of your fold. Trace the half circle and cut with fabric scissors.
Step 3: Leave the fabric folded and cut the fold open on just one of the sides. This opening will allow you to place your skirt over the base of the tree.
Step 4: To make the small ties that will keep your skirt closed once it’s on the tree base, cut 6 pieces of 6″ ribbon. Use a hot glue gun to glue them to the underside of your skirt in sets of 2.
Those are the basic instructions. Let’s get to the details!
")
How to Make a Pom Pom Tree Skirt:
For the pom pom skirt, all you have to do is follow the basic directions and then hot glue pom pom trim around the edge of the skirt. I love jumbo pom poms, so I bought the biggest trim I could find at the local craft store.
")
")
")
How to Make a Scalloped Tree Skirt:
To make a scalloped edge skirt, trace the bottom half of a round item (like a ribbon spool) all the way around the edge of the skirt once you cut your large circle.
I thought it would be fun to add a white tip to the edge of the scallops to make it look like little snow banks. So, once all the grey scallops were cut, I traced the edge onto some white felt as well.
After cutting the white scallops, I used fabric glue (although the hot glue gun would work, too) to secure the snow tips onto the grey.
")
")
")
How to Make a Faux Fur Tree Skirt:
The fur skirt is the easiest one because you have the least amount of things to add to it, but you have to be a little slower when cutting out your circles to keep the length of the fur intact around the edges.
I used the folding method (in step 1) to mark my cutting path, but I didn’t cut all the layers at once like I did with the felt.
I kept flipping and refolding the fur so I could mark all the way around the circle, and then only cut one layer deep making very small cuts as I went.
Tip: Try to keep the bottom blade of your scissors scraping as close to the backing of the fur as possible and that will also keep you from chopping the ends of your fur short.
After you make all your cuts into the fur, take it outside and give it a good shake so it won’t shed any more fur bits later.
")
")
Elsie’s tree agreed to model the skirts for our pictures (we love a white Christmas tree over here with some pretty garland).
We’ve also got a ton of Christmas content in our archives, so browse through there for more holiday projects and recipes! xo, Laura
Love this post? Sign up for our newsletter for more inspiration!

Get creative ideas for recipes, crafts, decor, and more in your inbox!

Get the How-To
3 quick ways to make a tree skirt (no-sew!)
Instructions
-
First, we are going to cut a big circle out of our fabric. An easy way to get an even circle is to make a big square that is at least the width of your tree skirt (I have a small tree so I needed at least 40″ wide).
-
Fold the square in half to make a long rectangle (20″ x 40″), fold that rectangle in half at the middle vertical line (20″ x 20″).
-
When using thin fabric-like felt, you can even make another fold to make your square a triangle like I did in the first picture (the fur is a little too thick to do that many folds).
-
No matter how many times you fold your fabric, just use a ruler and measure out half your circle diameter (so 20″ for me) from the center of your folded square all the way across your folded fabric.
-
Cut through the layers across the marked line with fabric scissors, and you should have a circle when you unfold it.
-
To make the small middle circle for your tree trunk, fold your fabric circle in half and place a round can or jar halfway across the middle point of your fold. Trace the half circle and cut with fabric scissors.
-
Leave the fabric folded and cut the fold open on just one of the sides. This opening will allow you to place your skirt over the base of the tree.
-
To make the small ties that will keep your skirt closed once it’s on the tree base, cut 6 pieces of 6″ ribbon. Use a hot glue gun to glue them to the underside of your skirt in sets of 2.
Pom Pom Tree Skirt:
-
For the pom pom skirt, all you have to do is follow the basic directions and then hot glue pom pom trim around the edge of the skirt. I love jumbo pom poms, so I bought the biggest trim I could find at the local craft store.
Scalloped Tree Skirt:
-
To make a scalloped edge skirt, trace the bottom half of a round item (like a ribbon spool) all the way around the edge of the skirt once you cut your large circle.
-
After cutting the white scallops, I used fabric glue (although the hot glue gun would work, too) to secure the snow tips onto the grey.
Faux Fur Tree Skirt:
-
The fur skirt is the easiest one because you have the least amount of things to add to it, but you have to be a little slower when cutting out your circles to keep the length of the fur intact around the edges.
-
I used the folding method (in step 1) to mark my cutting path, but I didn’t cut all the layers at once like I did with the felt.
-
I kept flipping and refolding the fur so I could mark all the way around the circle, and then only cut one layer deep making very small cuts as I went.
-
Tip: Try to keep the bottom blade of your scissors scraping as close to the backing of the fur as possible and that will also keep you from chopping the ends of your fur short.