

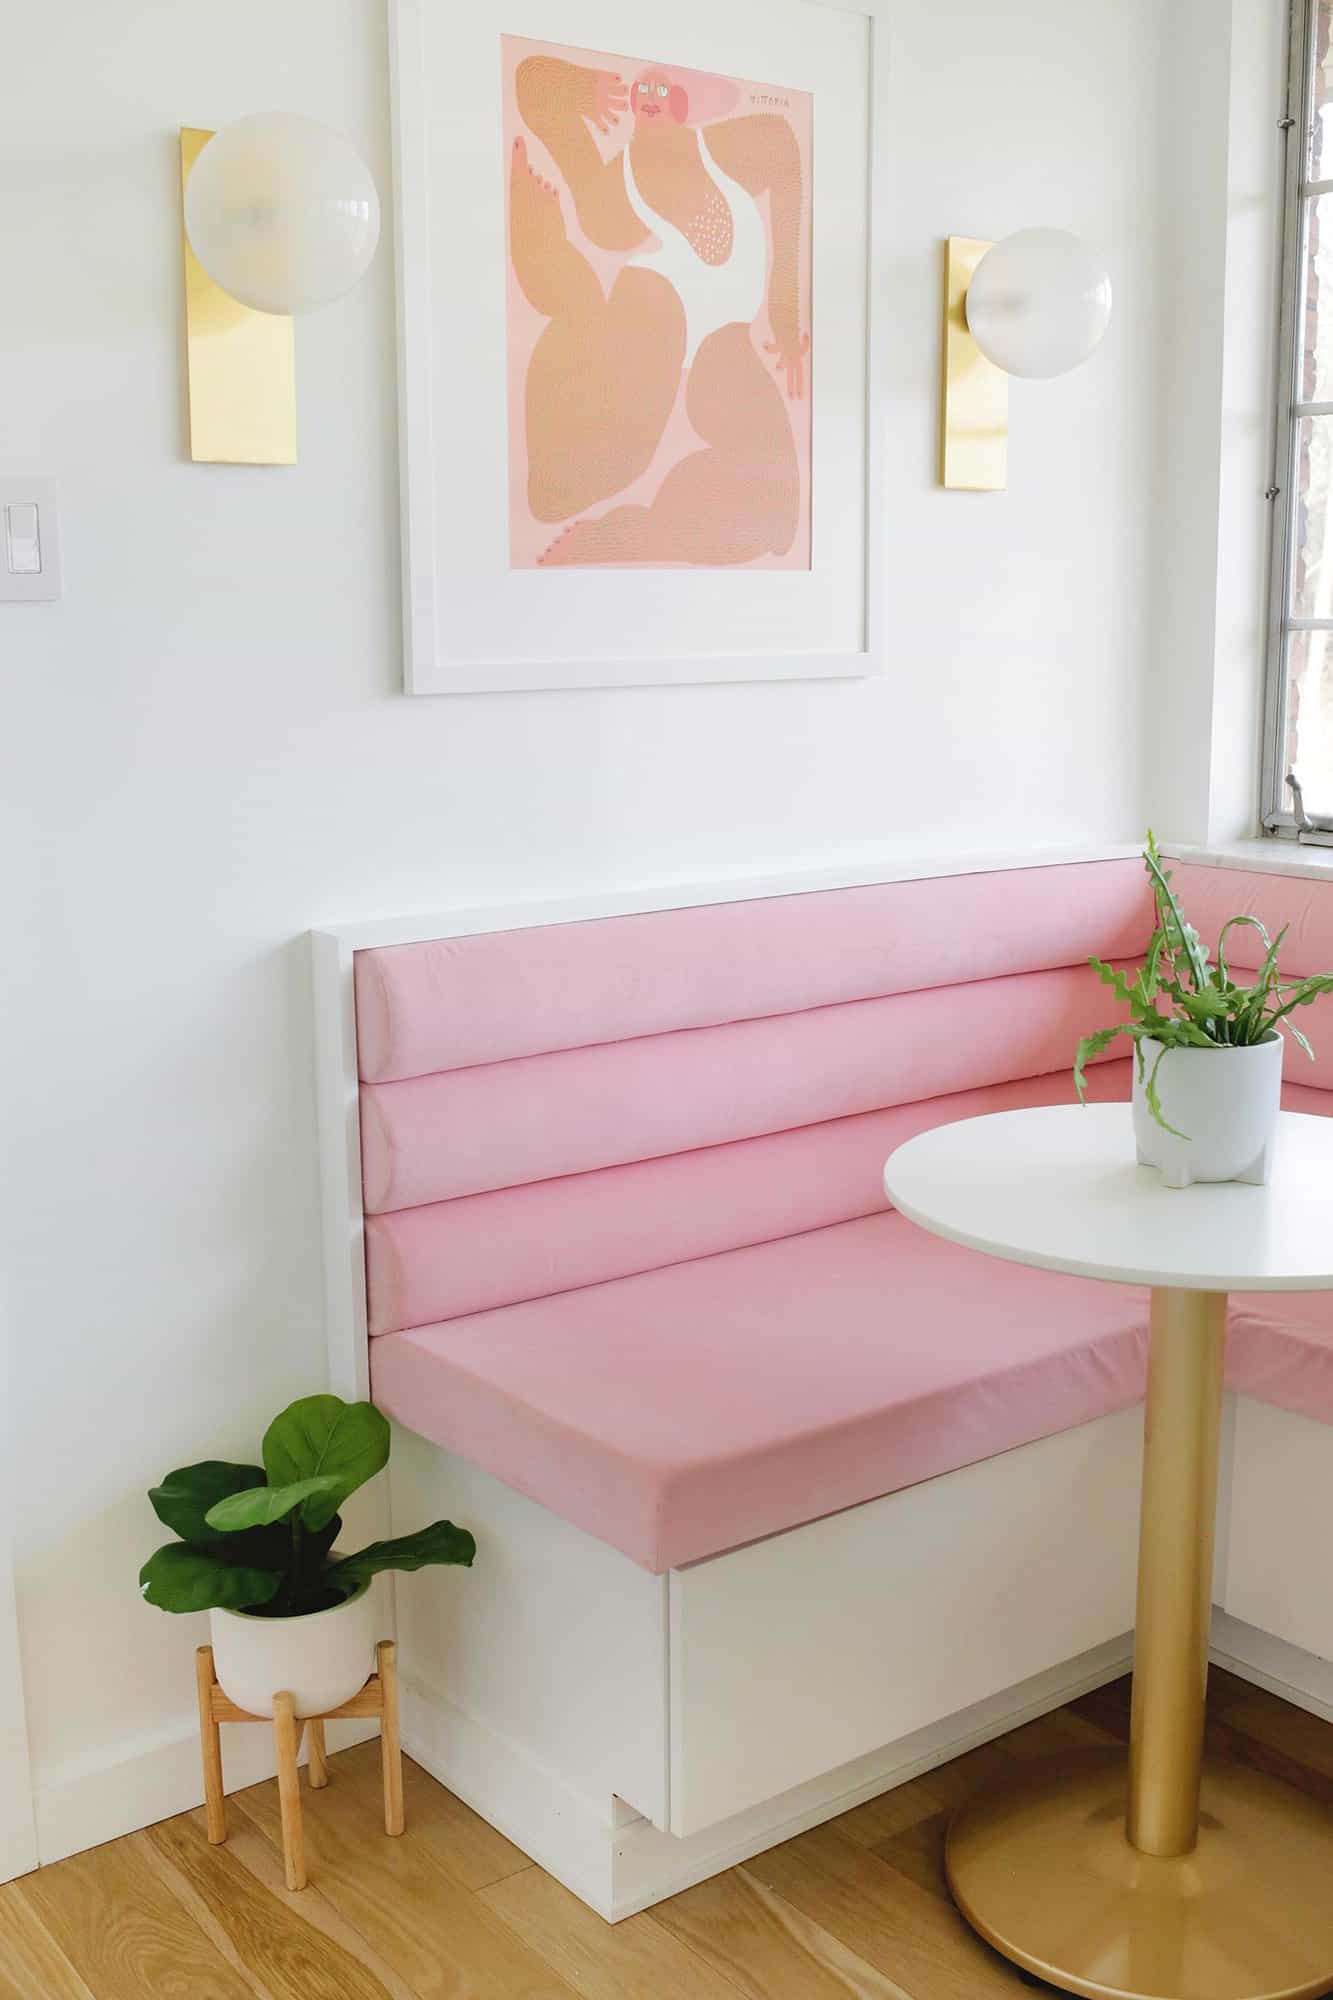
Have you ever wanted something for your home that felt a little bit crazy, buuut you really wanted it, so you just made it happen anyway? That’s basically how I felt about my pink velvet banquette in our newly renovated kitchen.
I knew I wanted some kind of breakfast nook since we had a corner of our kitchen that didn’t make sense as cabinets or extra countertop area.
When the idea of a banquette came to me, I knew I wanted to do it in the same vibe as the lovely (and very Pinterest-worthy) Sketch restaurant in London. Pink velvet was a must, and I thought I’d throw in some channel tufting to make it feel a little more special.
Thankfully, I was familiar with Mandi’s Channel Tufted Storage Banquette from a few years back, and I thought that would be a great start to the project.
Having the booth sit in an L-shaped corner with exposed ends (rather than cover a straight wall section end-to-end like Mandi had) posed its own challenges.
But after enough trial and error—and I was able to get it all figured out—you can take or leave whichever steps you need based on the shape and area you are adding a banquette to.
Supplies:
-velvet upholstery fabric (I used between 6-7 yards of this fabric in Bowie pink)
–batting to go between your velvet and foam
-6″ pine boards for backing of each half round bolster
–half round bolsters (I used 6″ wide bolsters and you can email them to ask them to cut them in half for you)
–metal strap ties (I used 8 with 4 on each section)
–upholstery foam (comes in different thicknesses but I used the 3″)
-plywood for base of seat
-sewing machine (optional depending on shape of cushions you need)
–jig saw or circular saw for cutting straight cuts on a plywood seat base or 3/4″ boards
–miter saw if you have a corner banquette to cut your 3/4″ boards at a 45° angle
-staple gun (electric recommended)
–construction adhesive (optional)
-L-shaped corner braces (I used several of these 1 1/2″ brace packs)
-3″ or 4″ trim boards to trim out your banquette (optional)
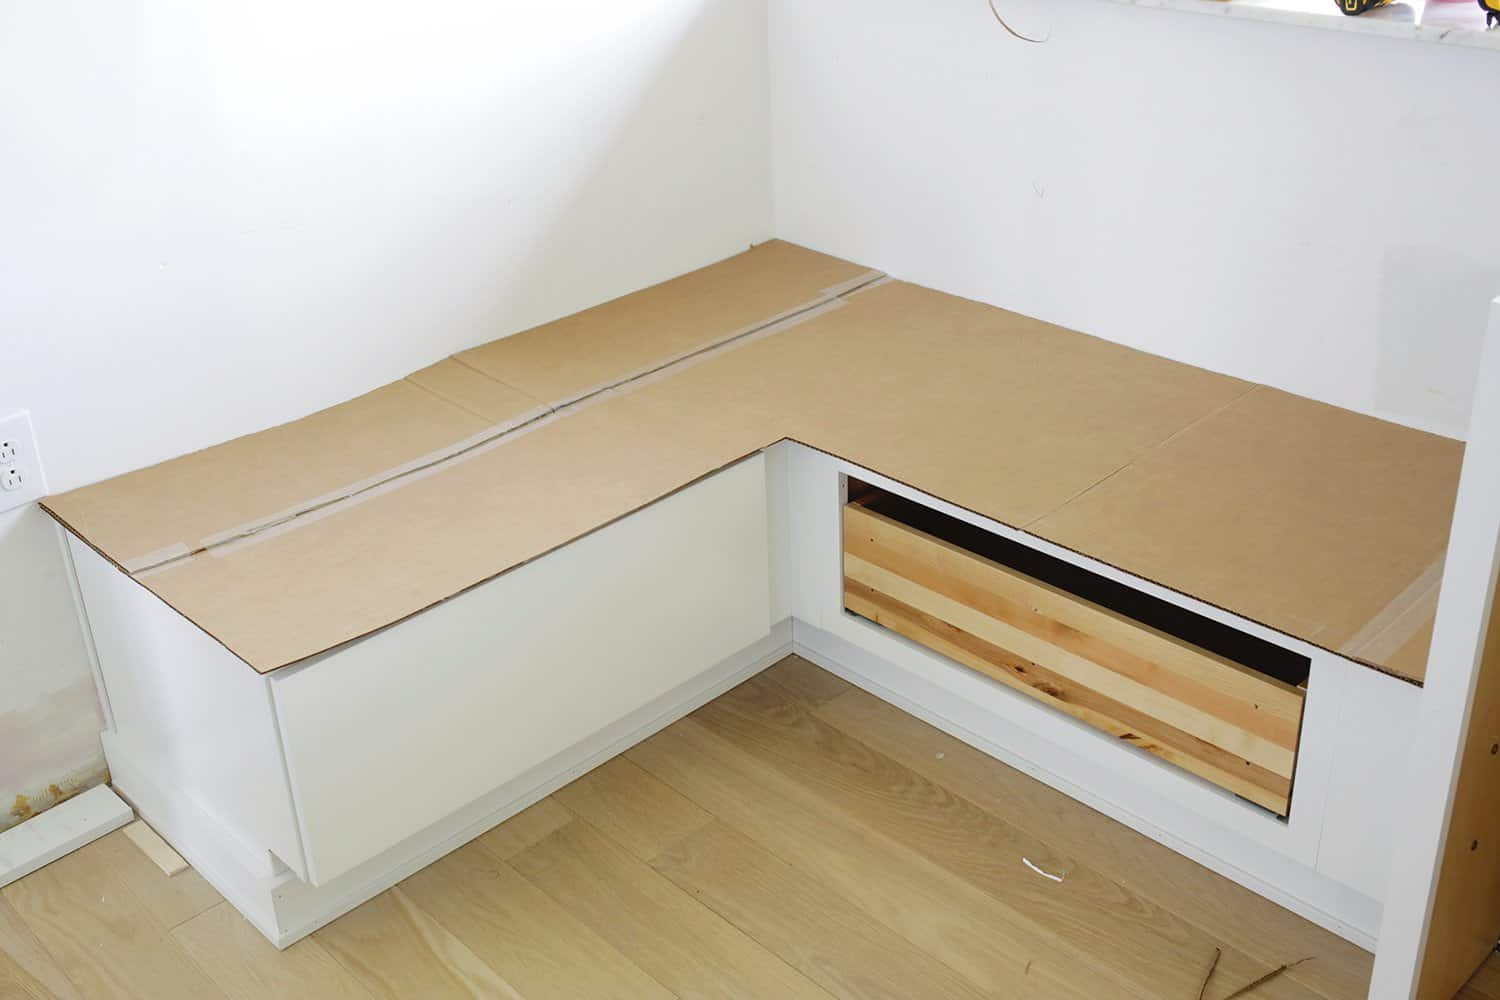
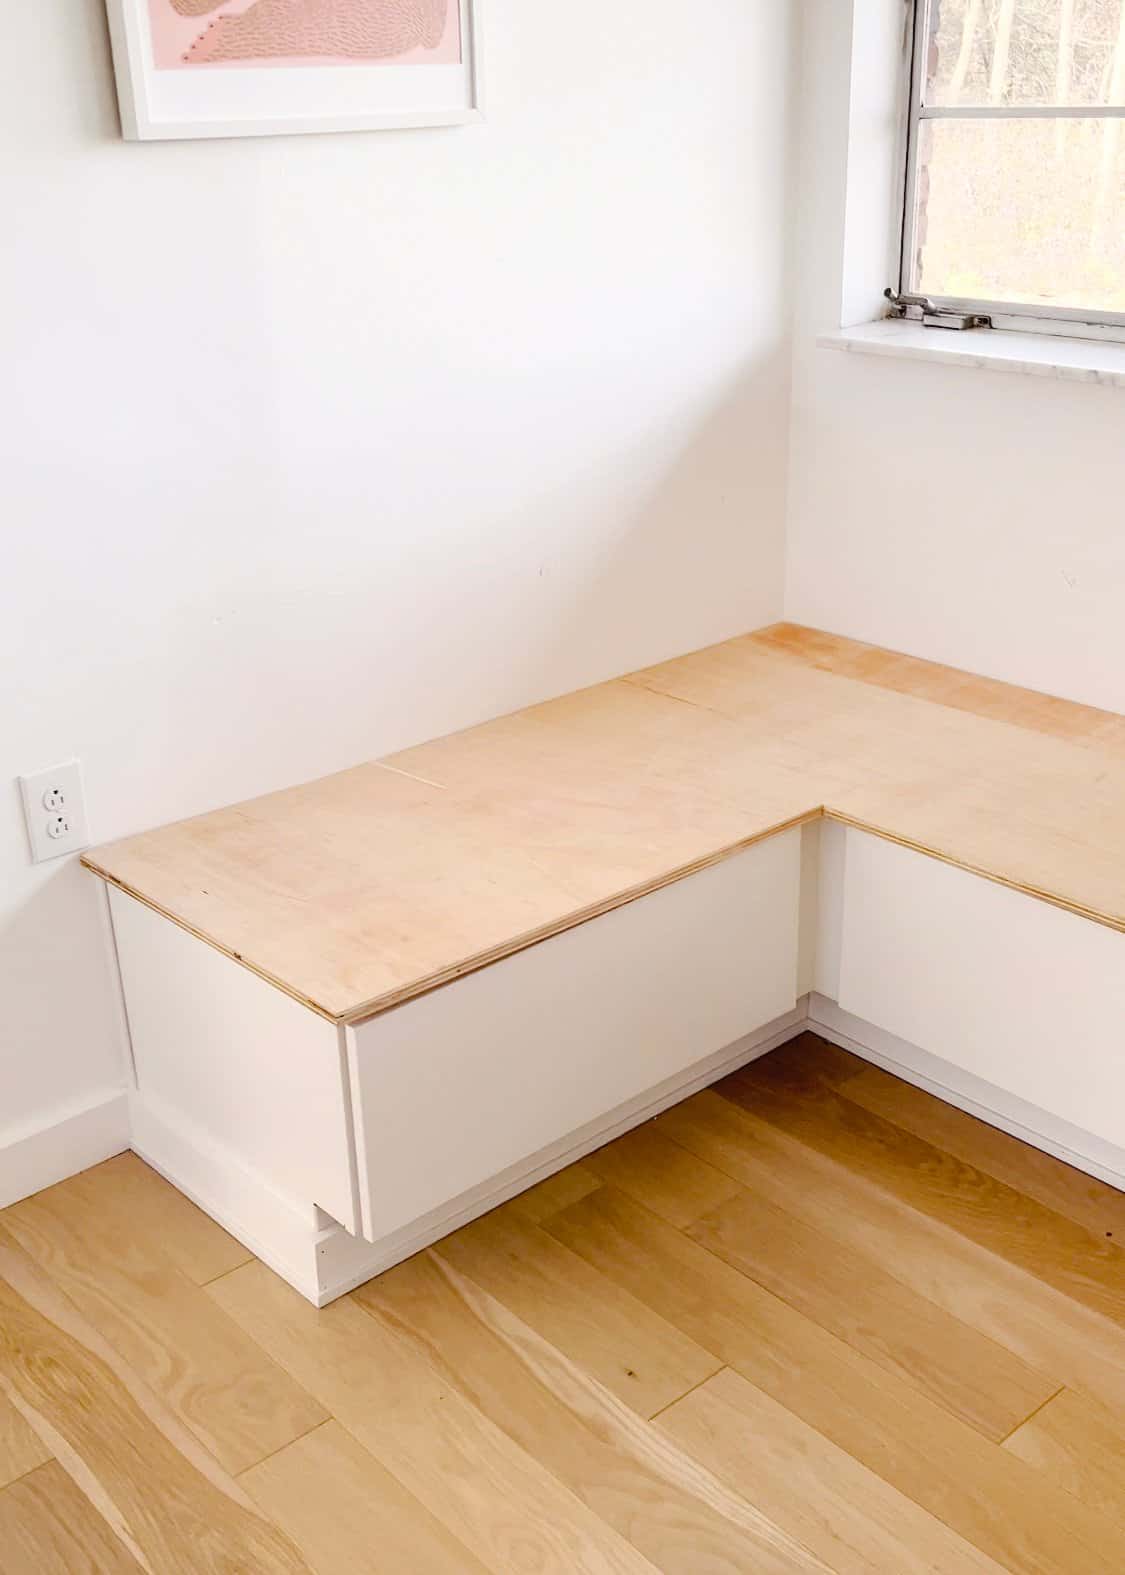
Make the Seat Base: First, I needed to get a large plywood board and cut it down to the shape of my L-shaped seat area. We had the base cabinets installed when we got the rest of our kitchen cabinets put in, so I just built on top of those (Mandi’s banquette post shows you how to build a bottom if you want to build your own).
I wanted the seat to hang over from the front and side edges of the seat about 1″, so I made sure that overhang was there as well. Then, I cut out the shape with a jig saw.
You can also use a large piece of cardboard to make a cardboard template first (like I did to trace onto the wood) if you want to, but be sure it fits before cutting the wood. Highly recommend!
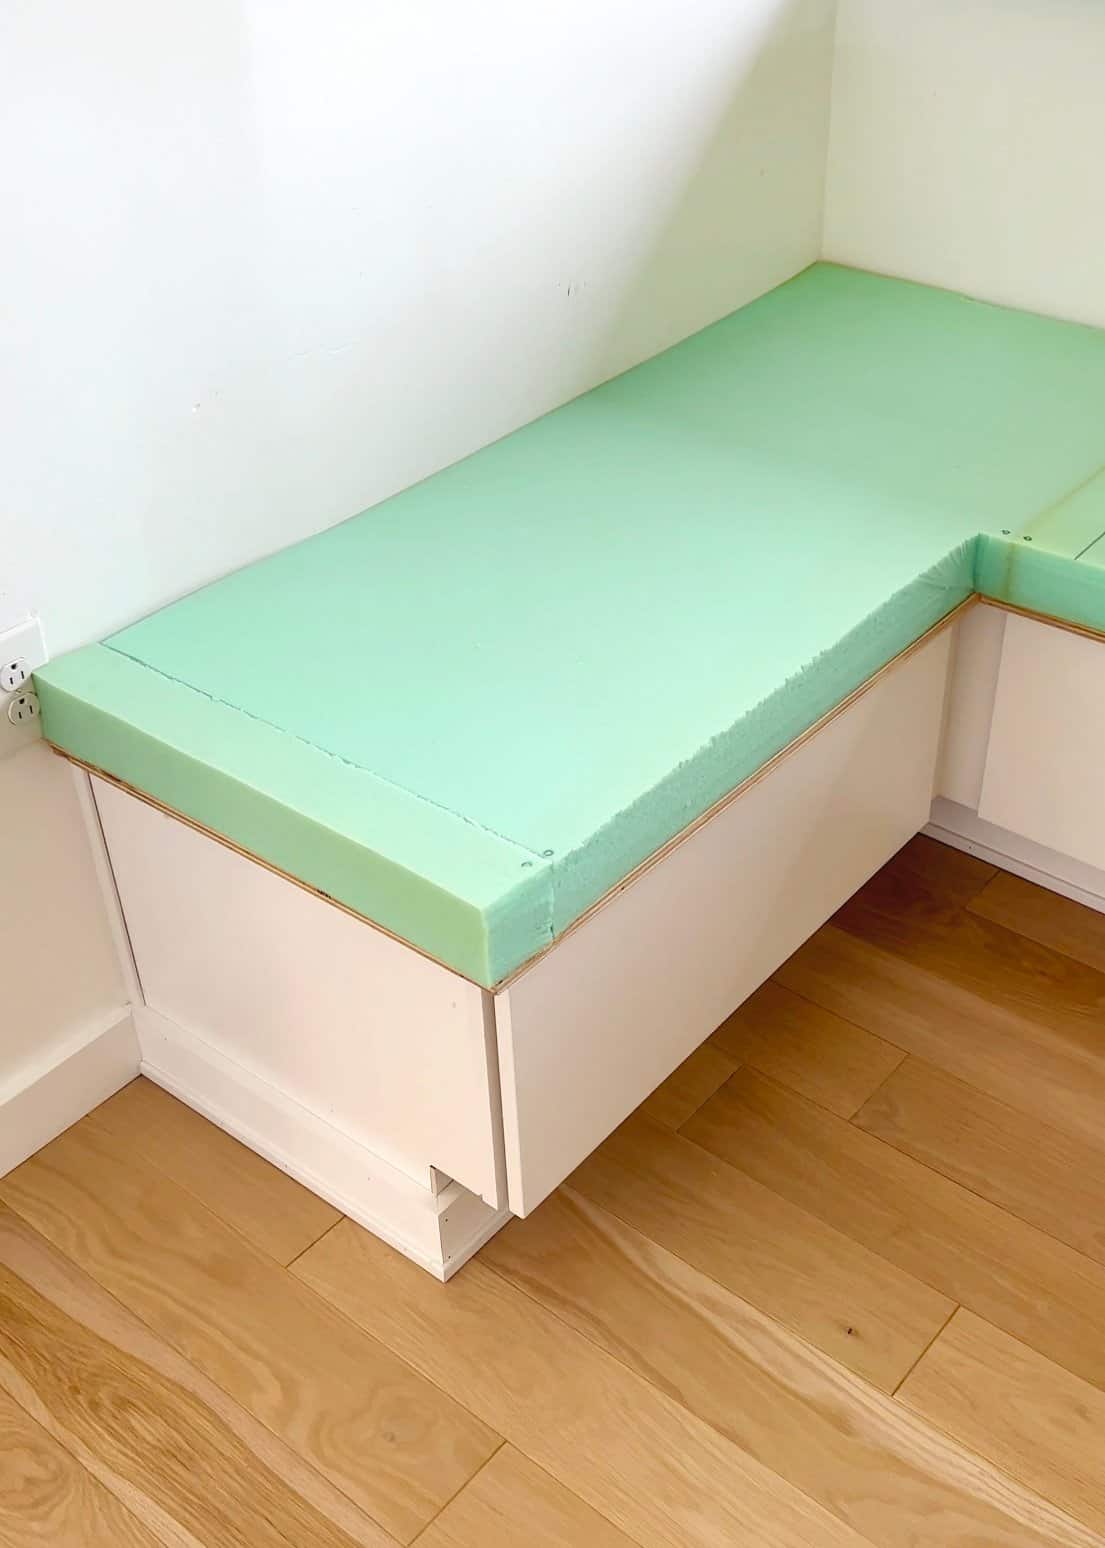
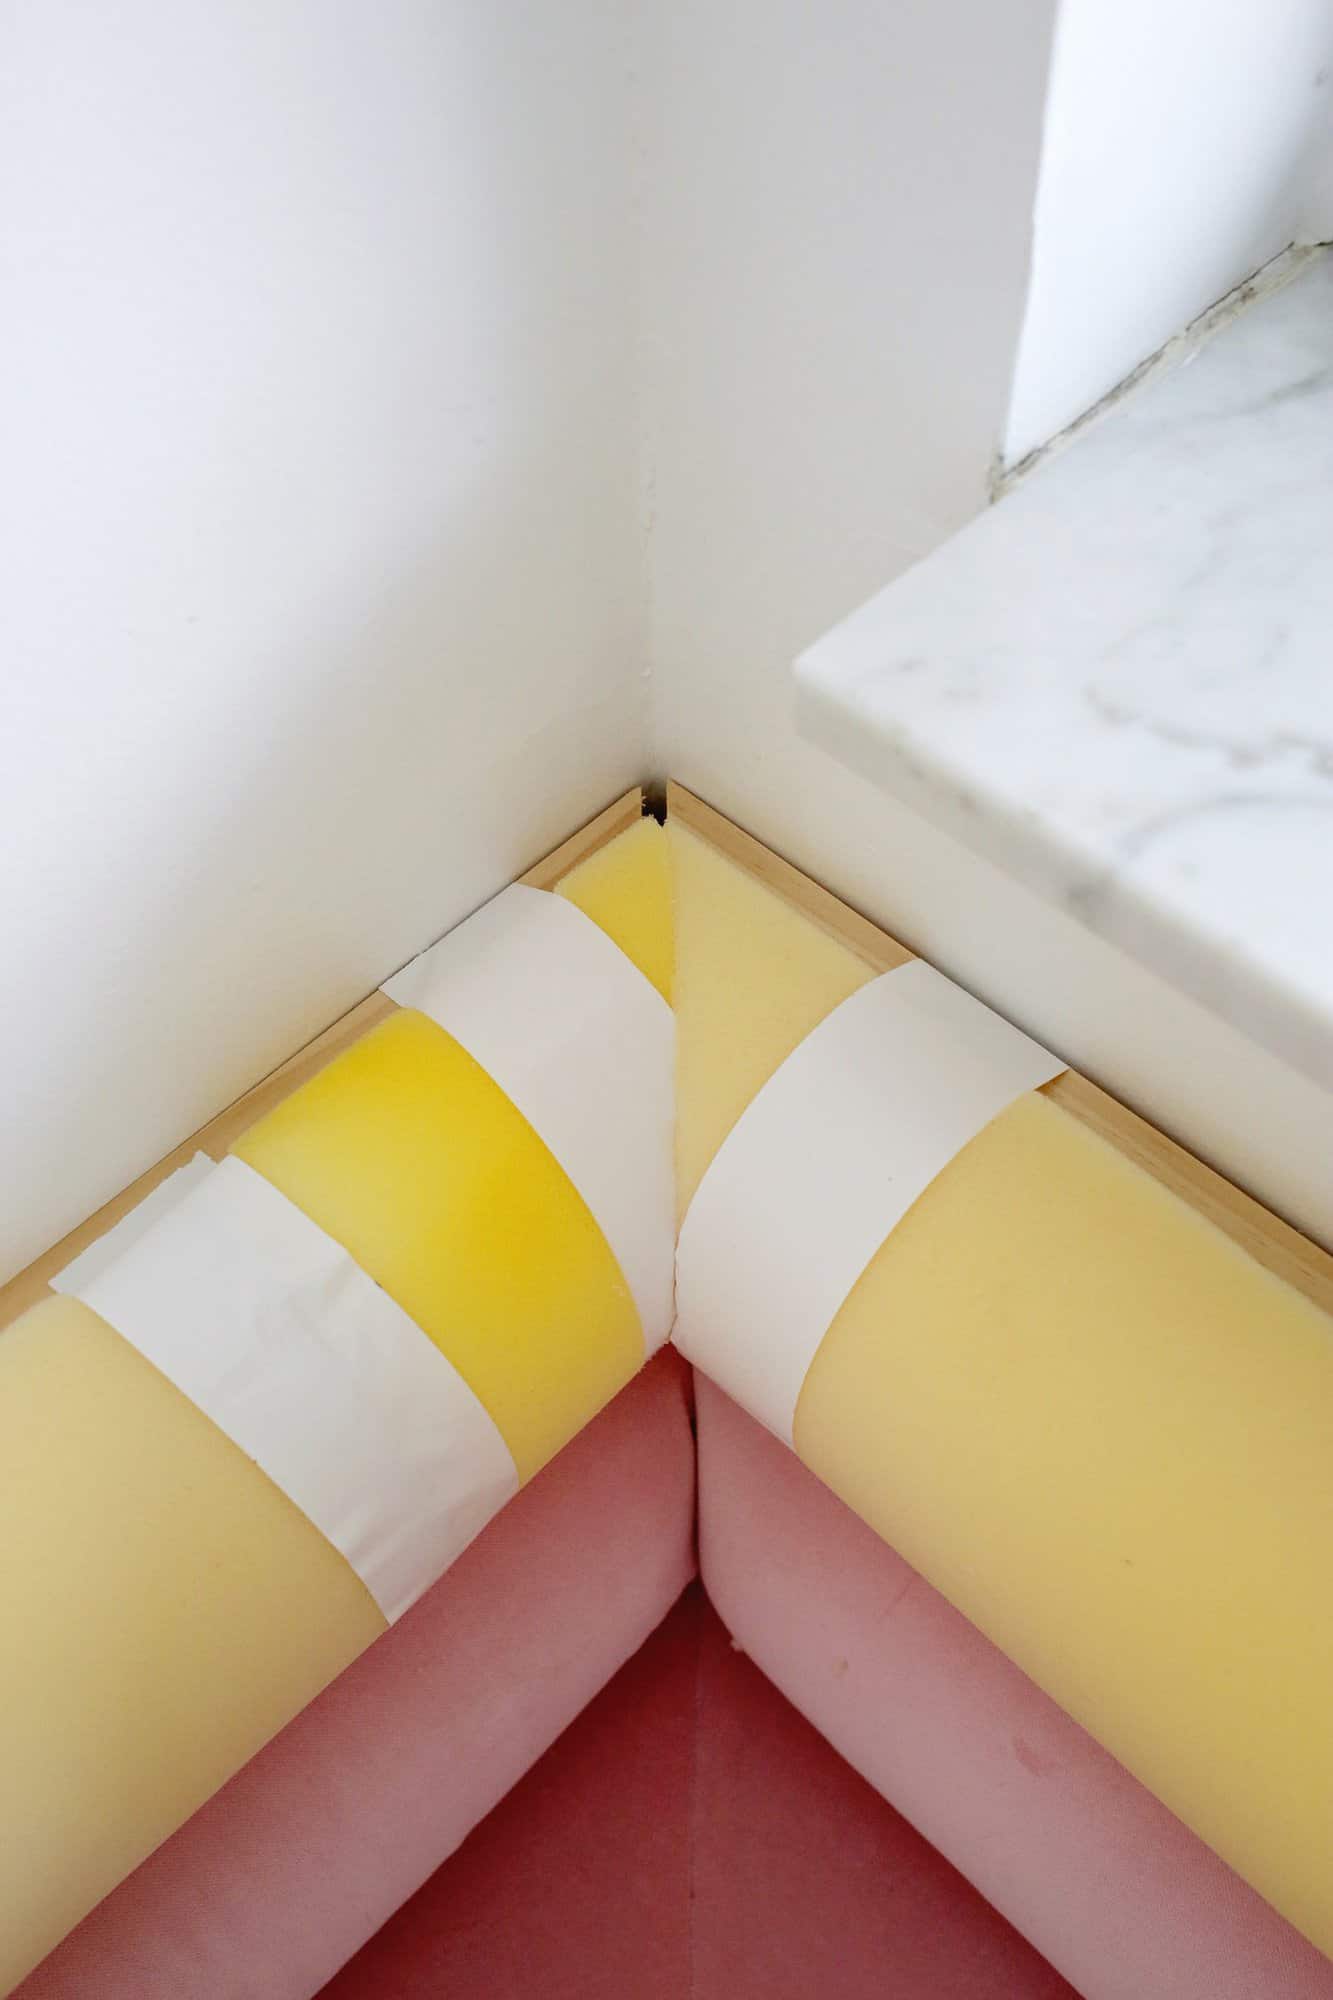
Once the wood was cut, I put two pieces of seat foam next to each other to make an L shape and marked where they should be trimmed with a marker to fit the shape of the seat.
For cutting foam, either an electric bread knife or a standard bread knife are the best for slicing through the green upholstery foam.
Cover the Seat: Once the seat was shaped, it was time to cover it in velvet. If you have a straight bench with no corner to turn, you can basically flip your seat upside down and place it foam side first onto the underside of your velvet fabric with some batting in between the velvet and foam layers.
Your fabric will be face down on the floor with batting on top, and then the upside down seat will be on top of that.
For a no-sew option, you can simply pull and wrap the fabric up and over the sides of the seat and staple in place on the plywood every few inches to keep it in place. Then, wrap the corners like a present (you can see how Kara did that in this DIY Color Blocked Velvet Bench tutorial).
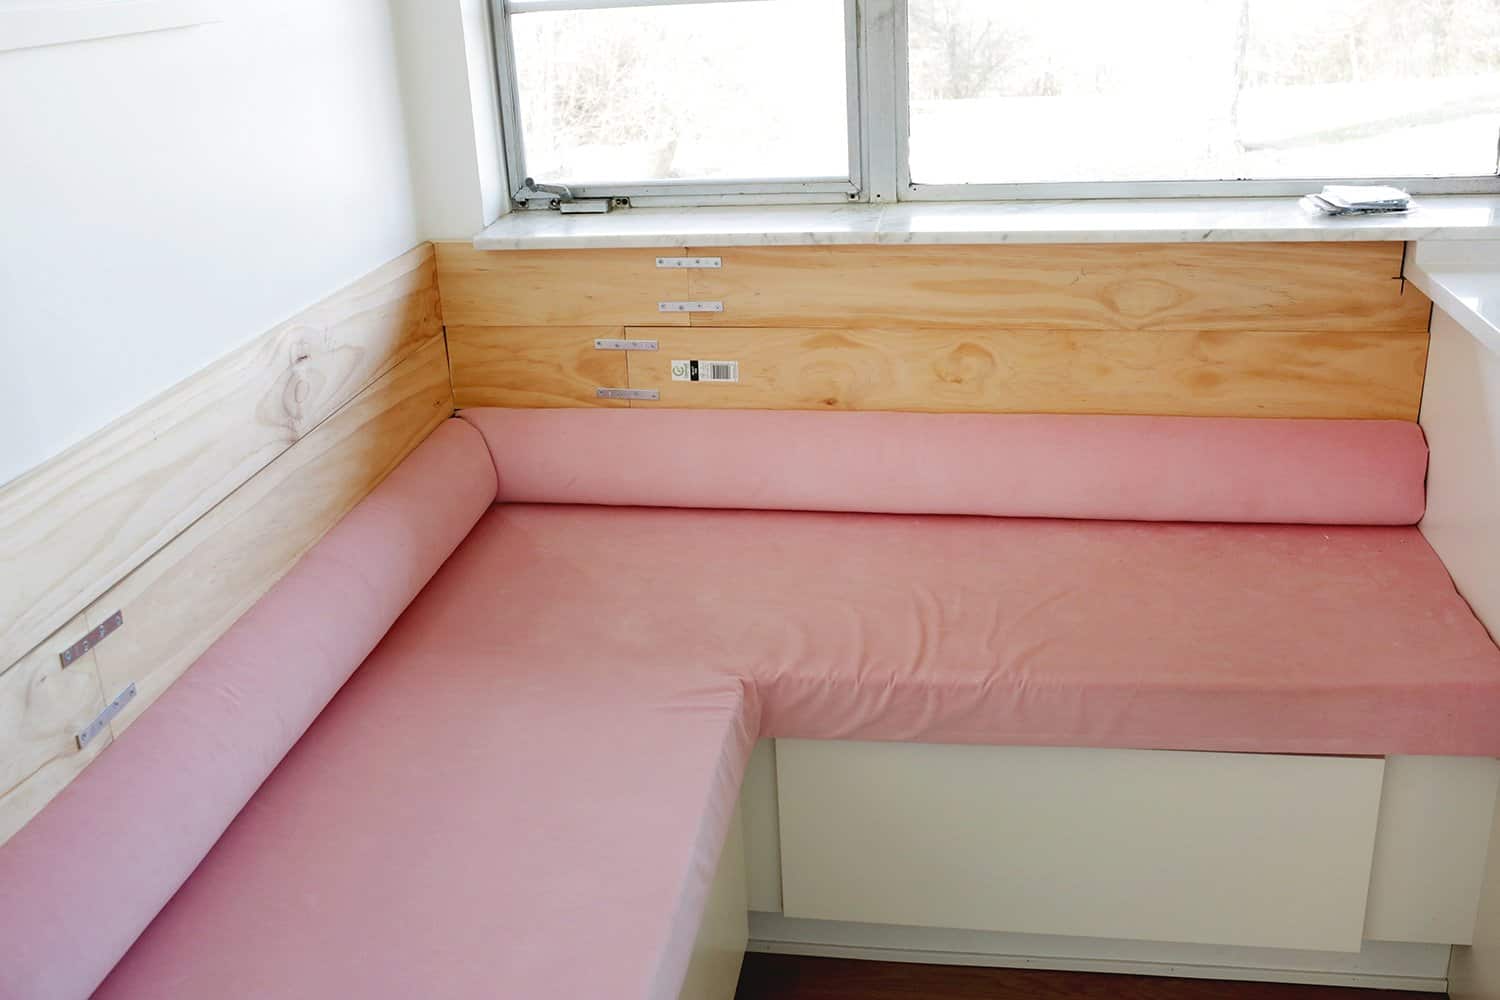
You can see that my L-shaped cushion has a seam where the two sides meet in the middle at a 45° angle, so I had to pin and sew my fabric together along that line first and then wrap and staple it to the underboard.
That meeting point where it waterfalls down the front of cushion can be a tricky point, but you can either fold and staple the excess under to get it as smooth as you can, or you can try and pin the excess on the back side.
Then, sew a seam down the front like I did so you can cut away bulk excess so it looks a little smoother. It’s not perfect for sure (I wish I was a master seamstress in times like this!), but it works well enough to get the job done.
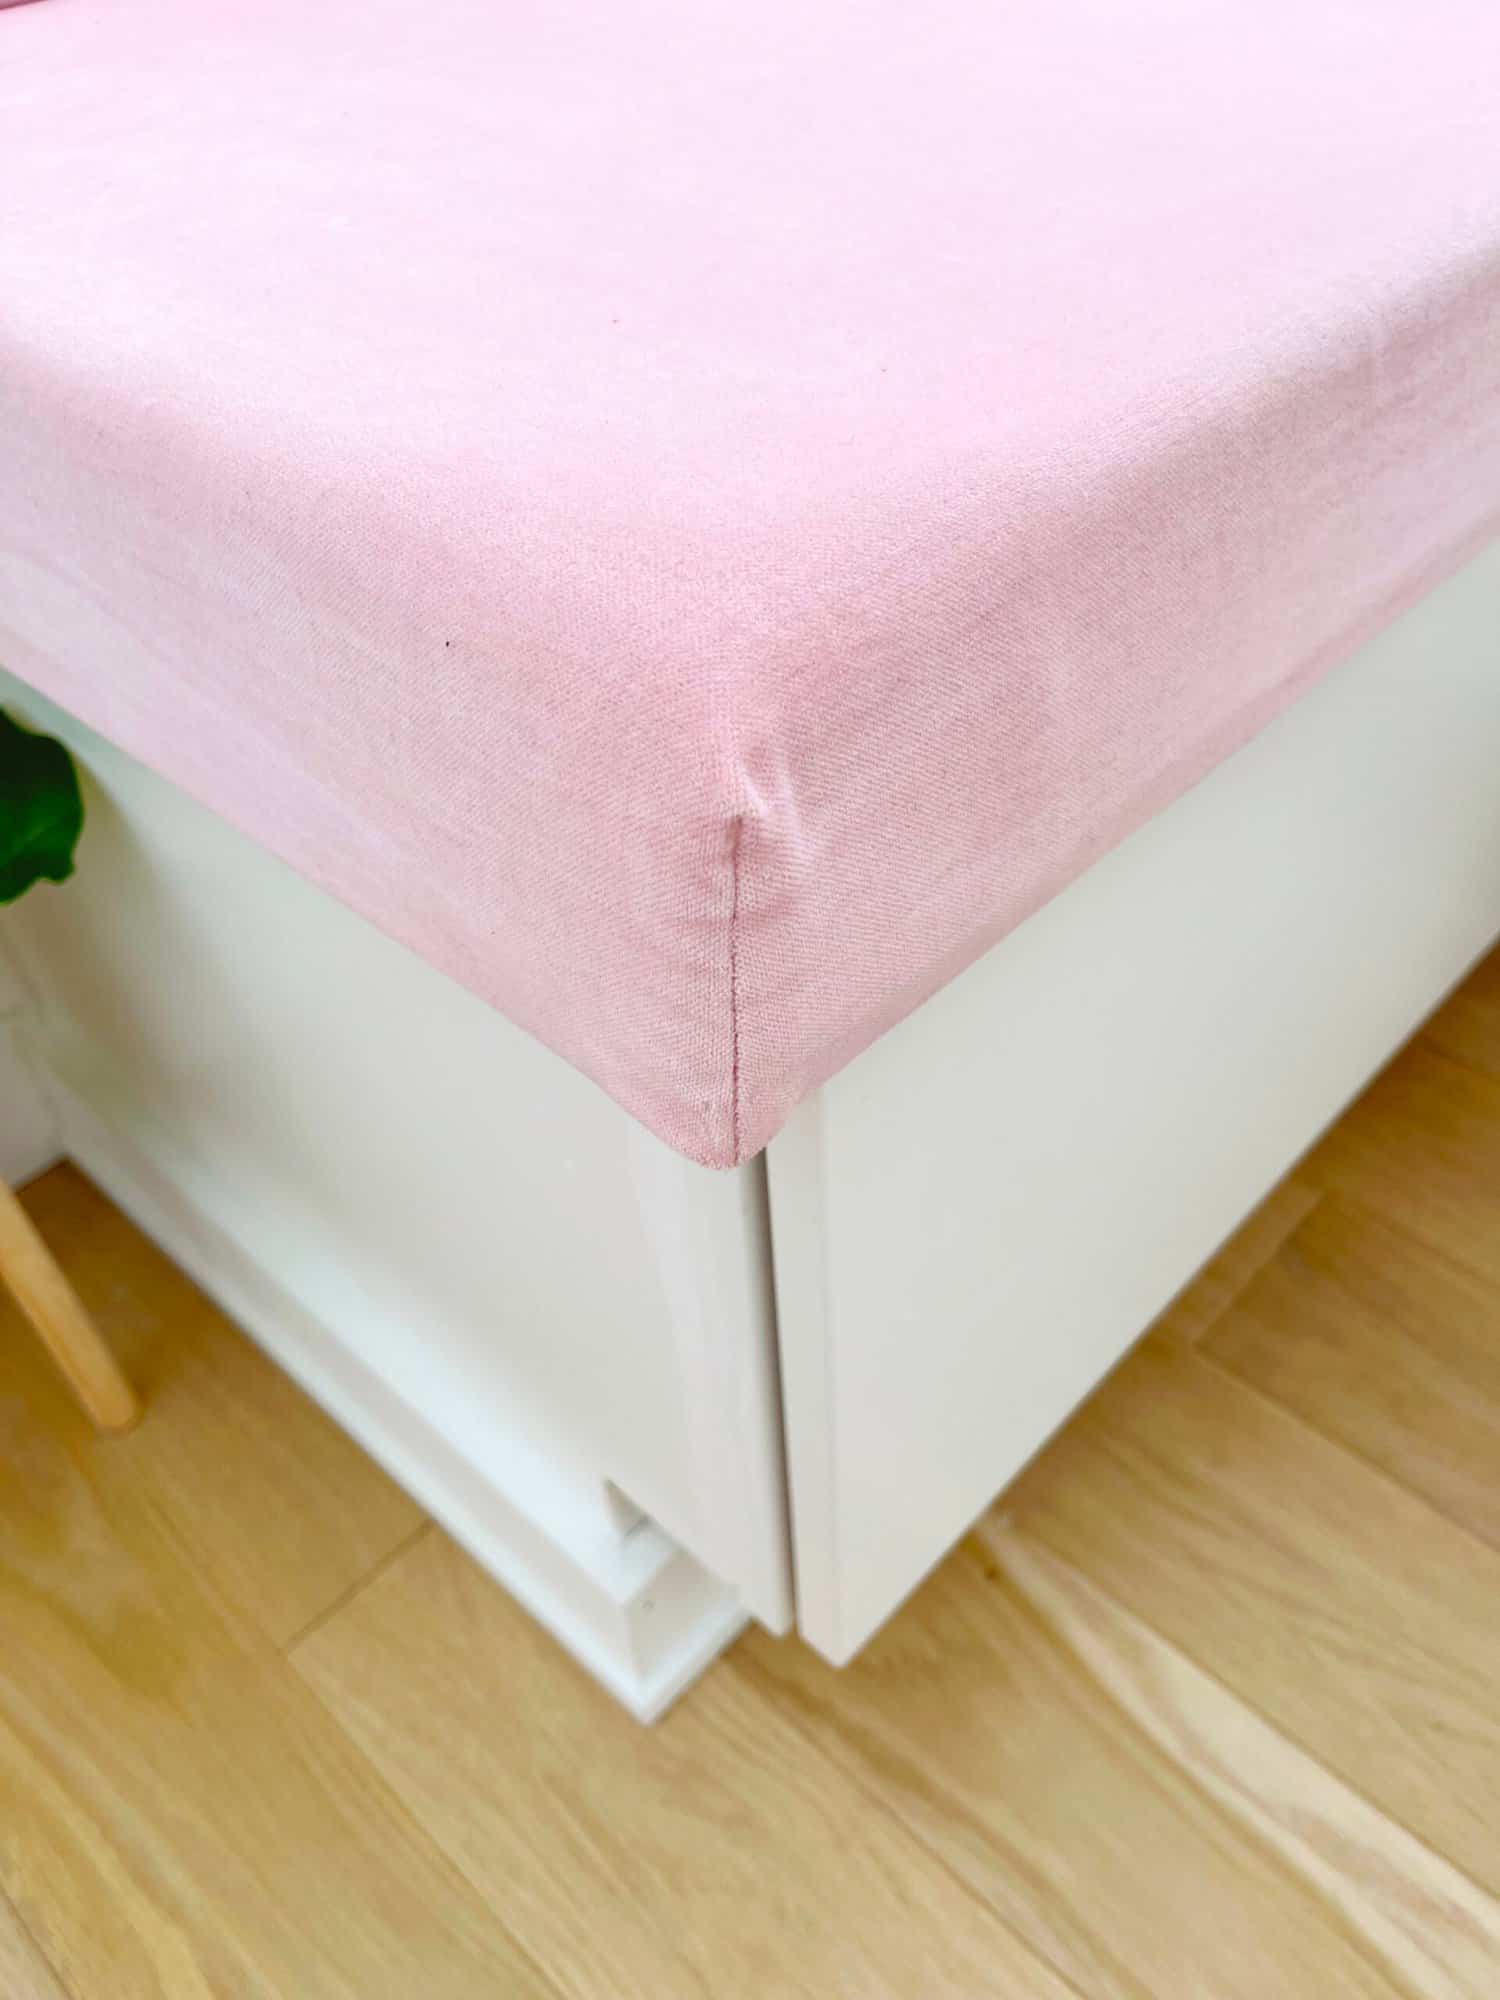
I wanted the exposed corner to look more finished on mine, so I did the wrap-and-staple method I mention above on all the hidden corners. I pinned and sewed a box corner on the one exposed corner to give it a more polished look before folding the extra fabric under to staple.
*Note: Remember, if you use velvet, pay attention to which direction the grain is going when attaching it so it’s all flowing the same direction when attached!

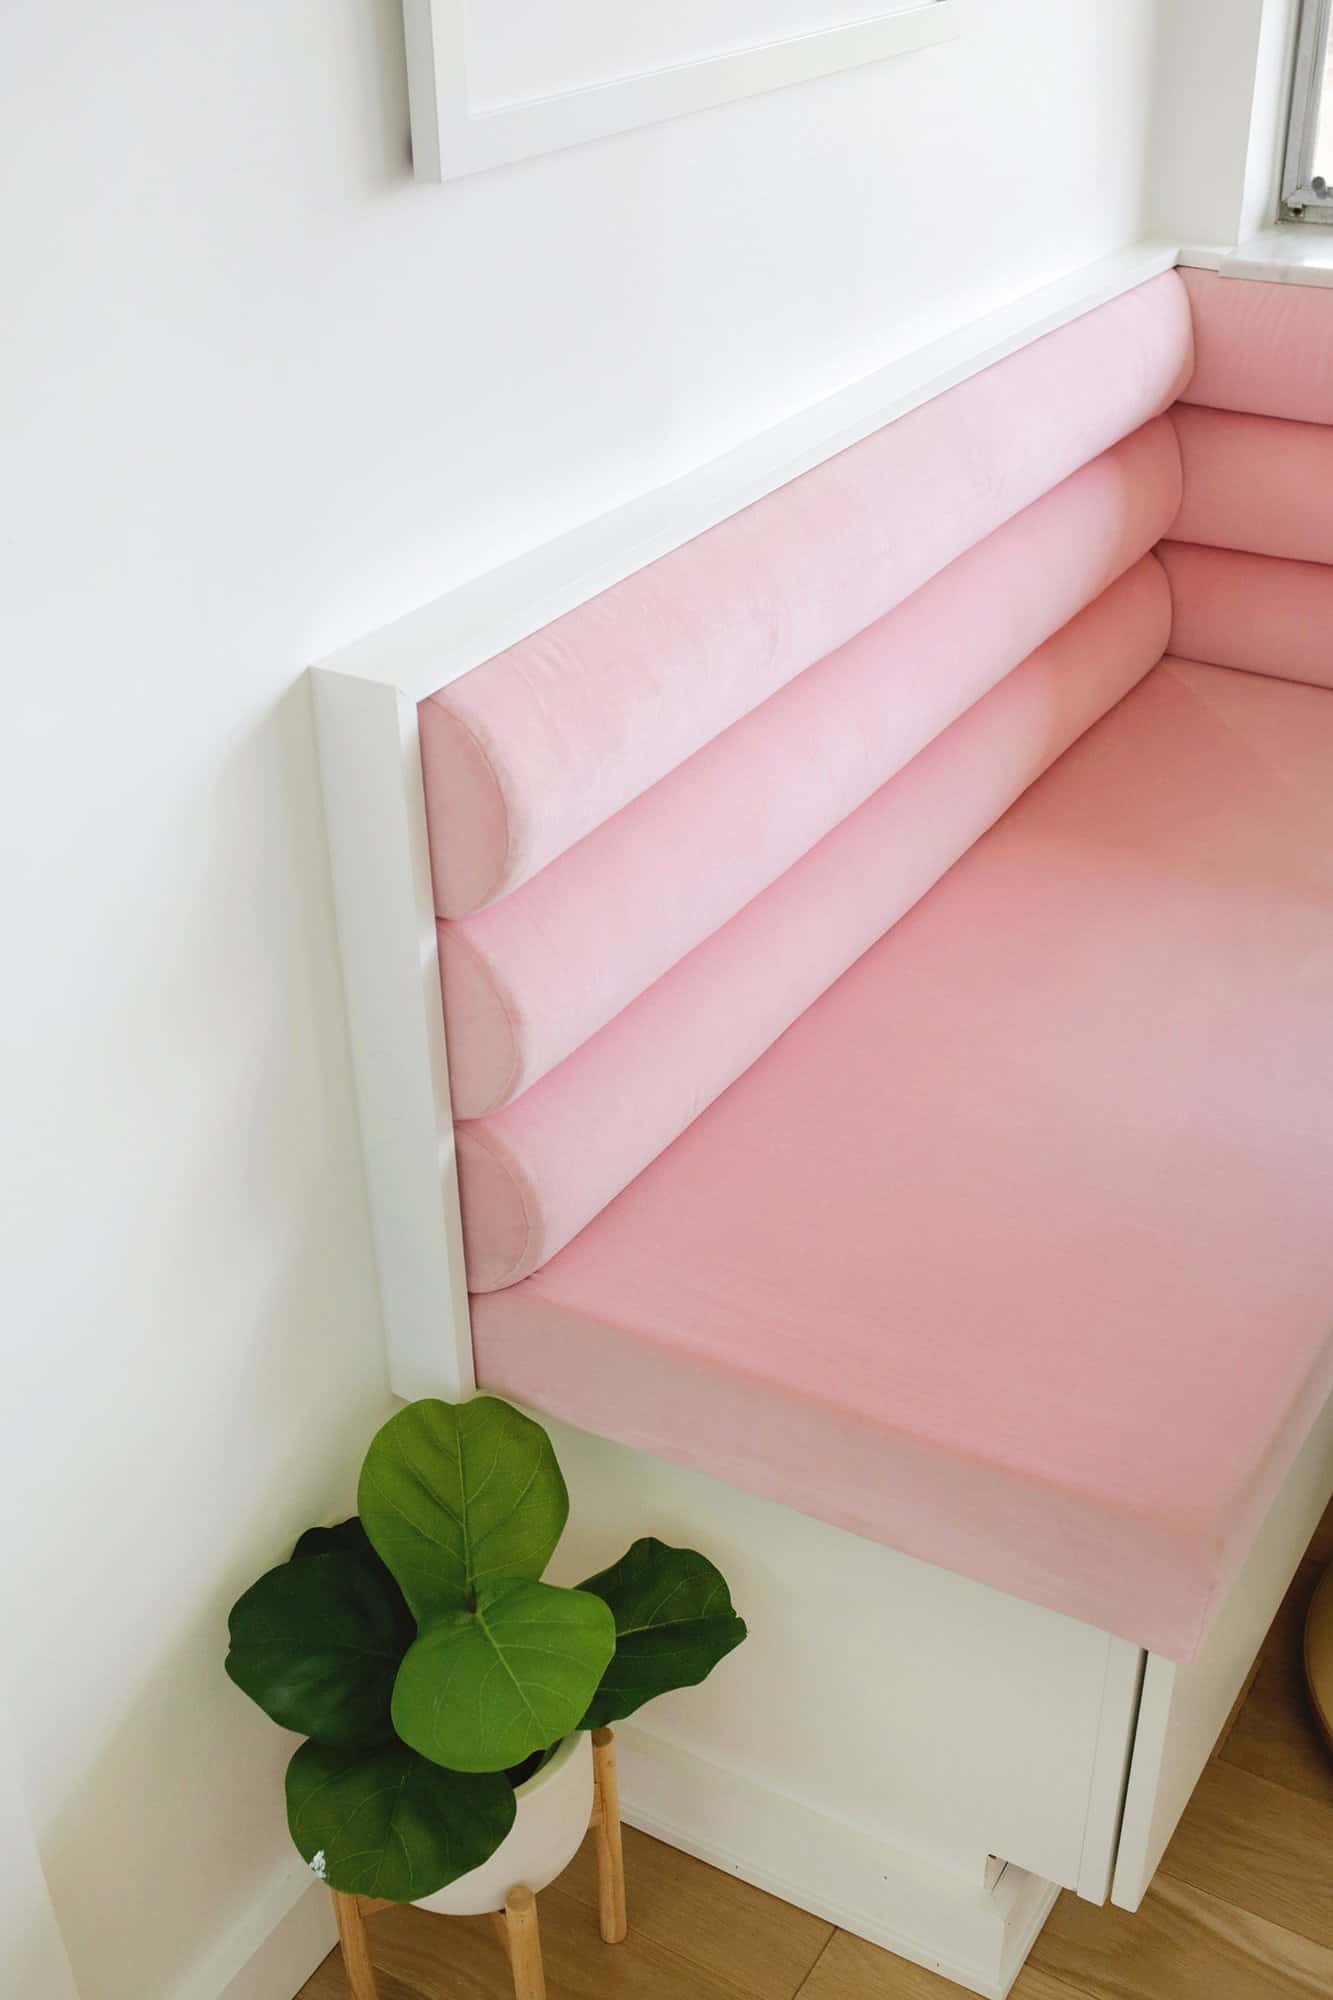
Cut the Wood/Foam Sections: Once the bench bottom was complete, it was time to move onto the channel tufted section! I took my 3/4″ thick boards that were the same size as my half round bolsters and cut them to the lengths of my left and right top sections (3 for each side).
Since I have a corner to deal with, I also mitered the boards at a 45° angle on the edges where they would meet in the middle.
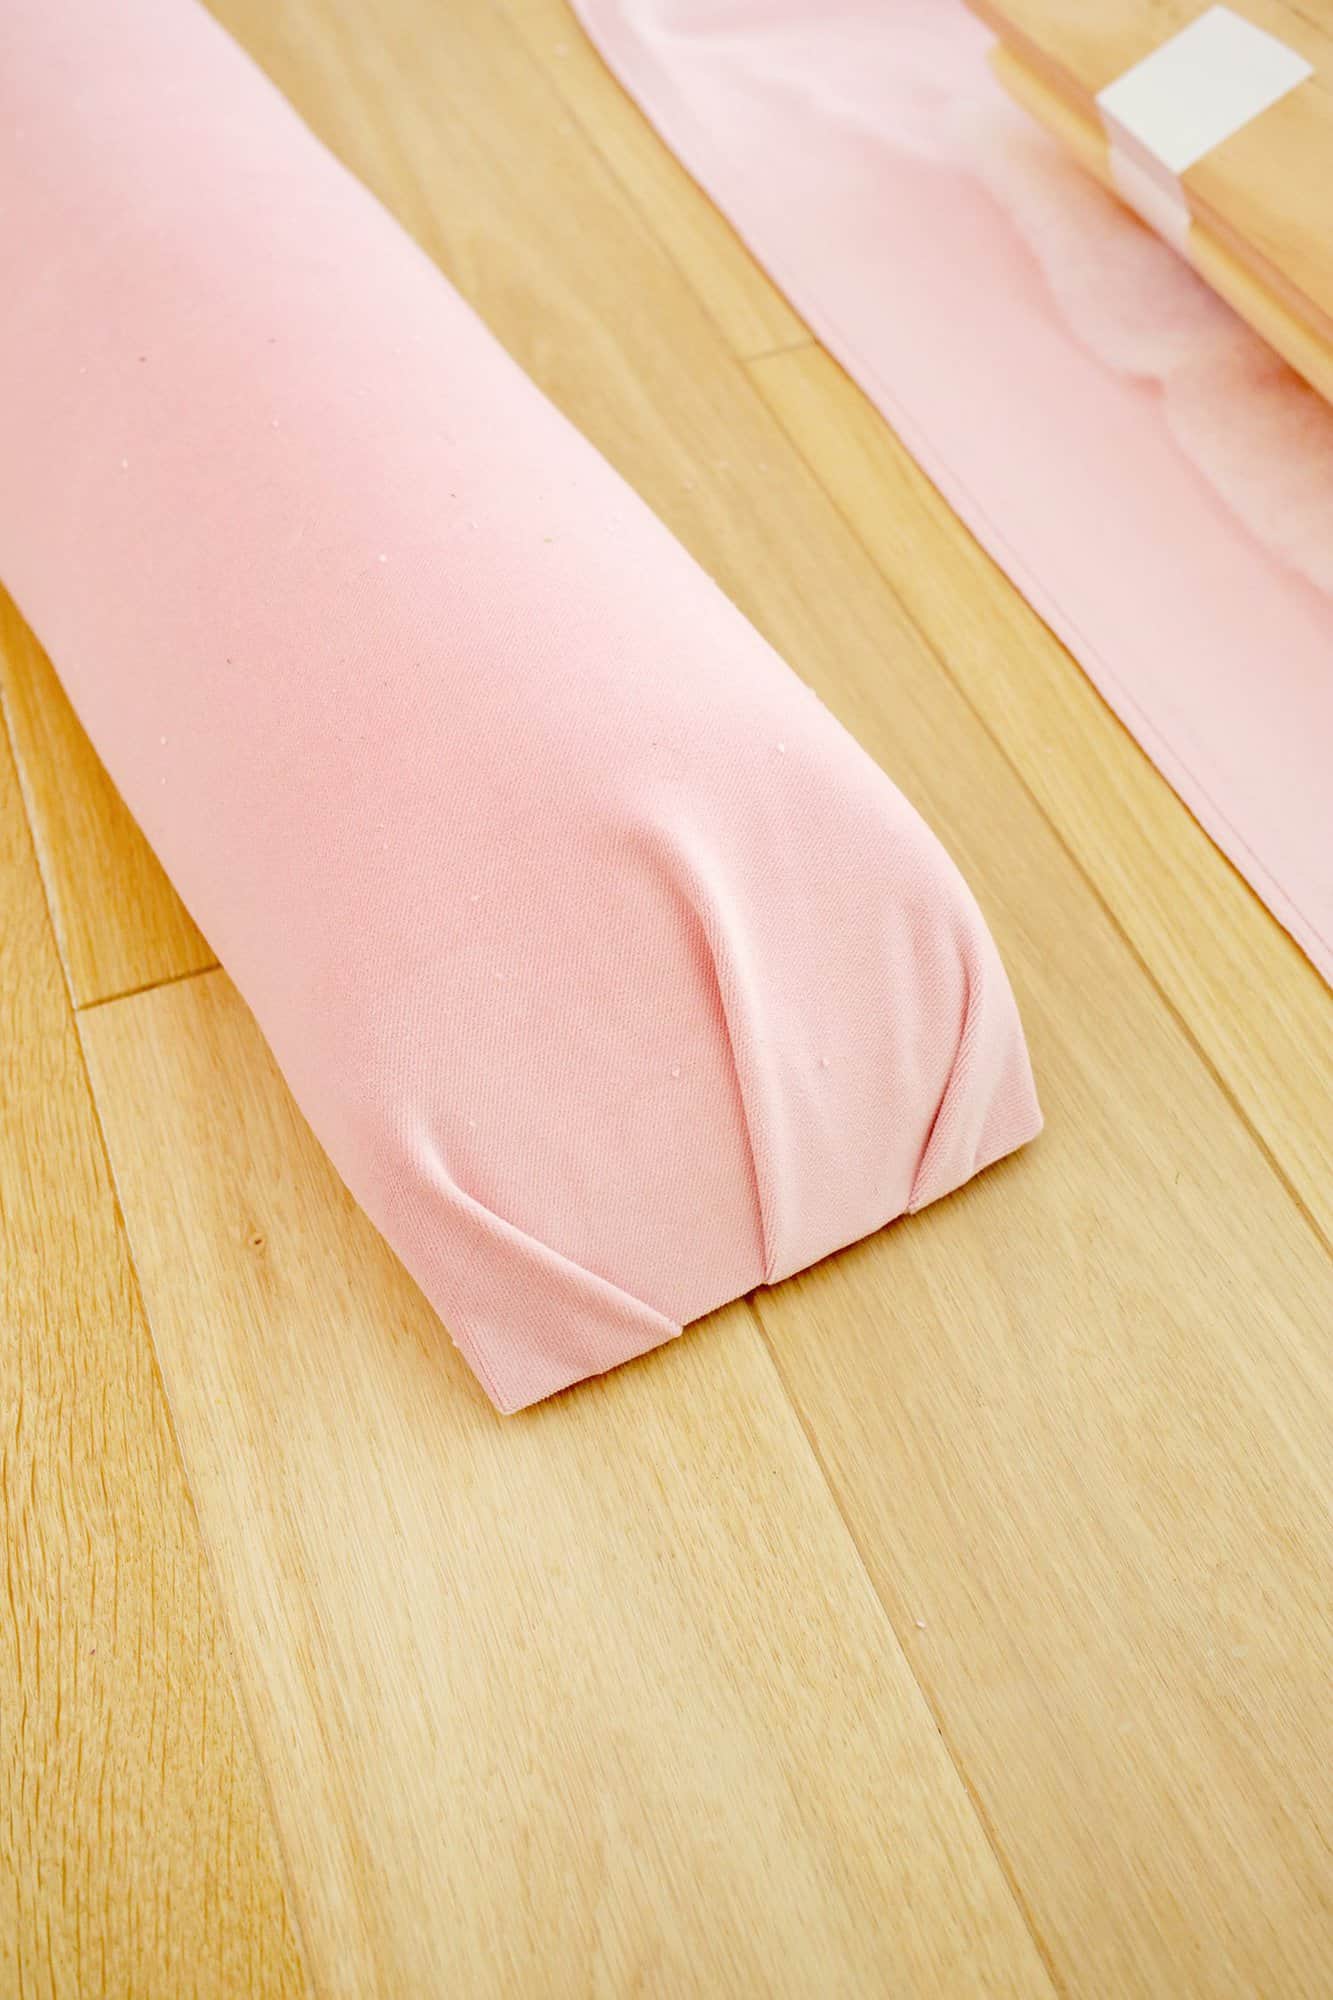
Then, I laid the half round bolsters on top of the boards (you can use some tape to get them to stay on the board temporarily) and cut them down to fit the boards. I cut the straight outside edge first (or just lined it up with an existing end of a bolster).
Then, for the mitered 45° angle side in the middle, I would cut it straight, hold it up where it was going on the wall, and then use the knife to eyeball a 45° angle cut like you see above.
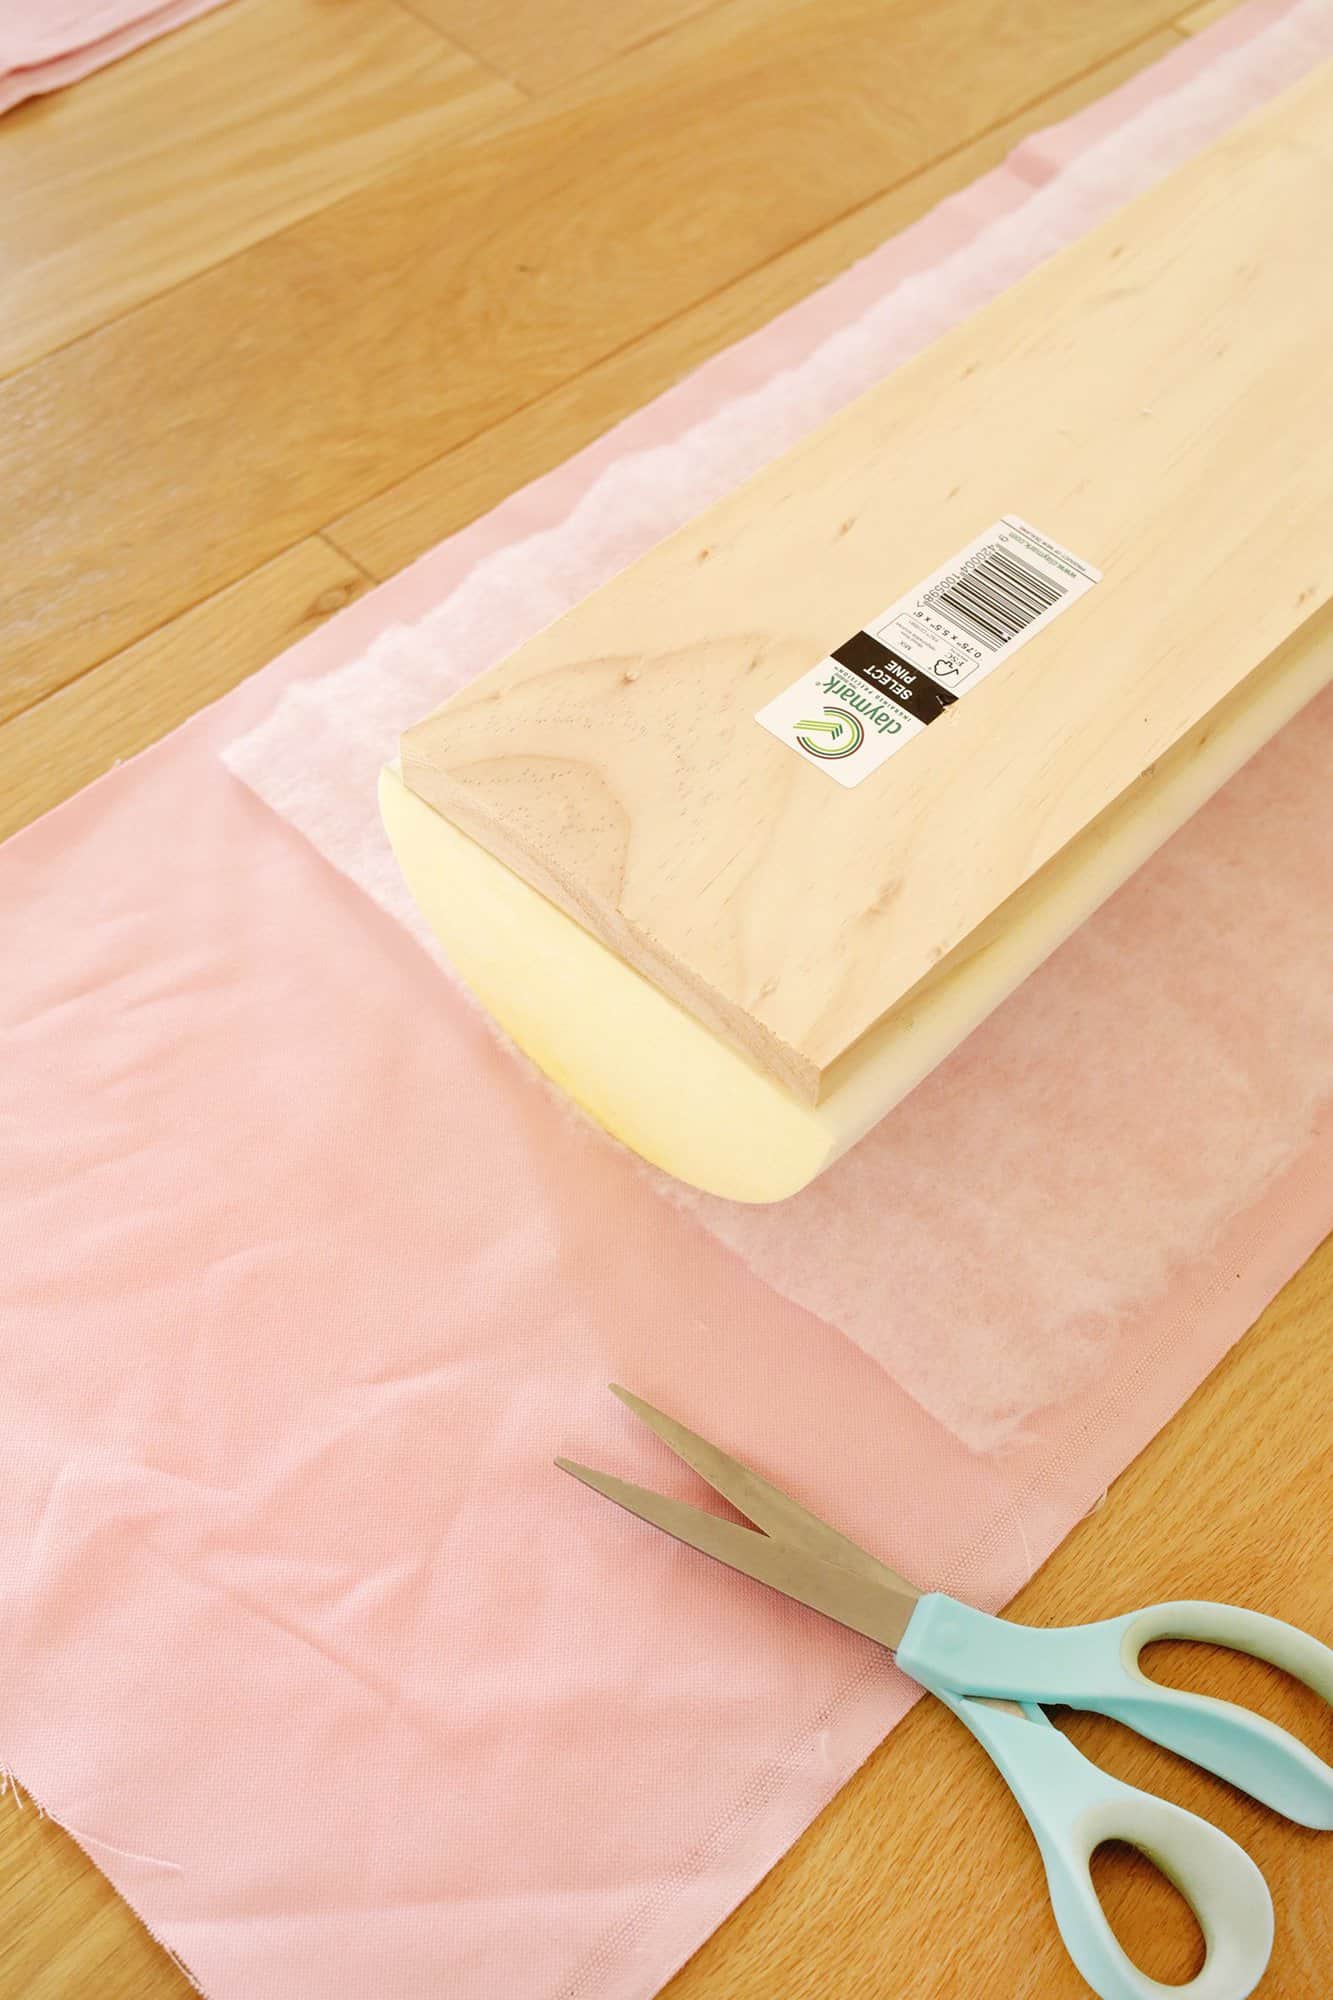
Wrap the Sections: Once the foam was cut for the channel tufted pieces, I put strips of velvet I had pre-cut on the floor.
The strips were long and wide enough to to cover the front and could be wrapped around the back to staple face down. Then, I added a layer of batting, and my board with the foam (foam side down).
For the mitered edges that meet in the middle corner, I folded the fabric several times and stapled it underneath.
I also did the same for outside edges that wouldn’t be seen (the right side of the banquette runs into our cabinets), but you can do this wrapping method for any seen edges as well if you don’t mind the look.
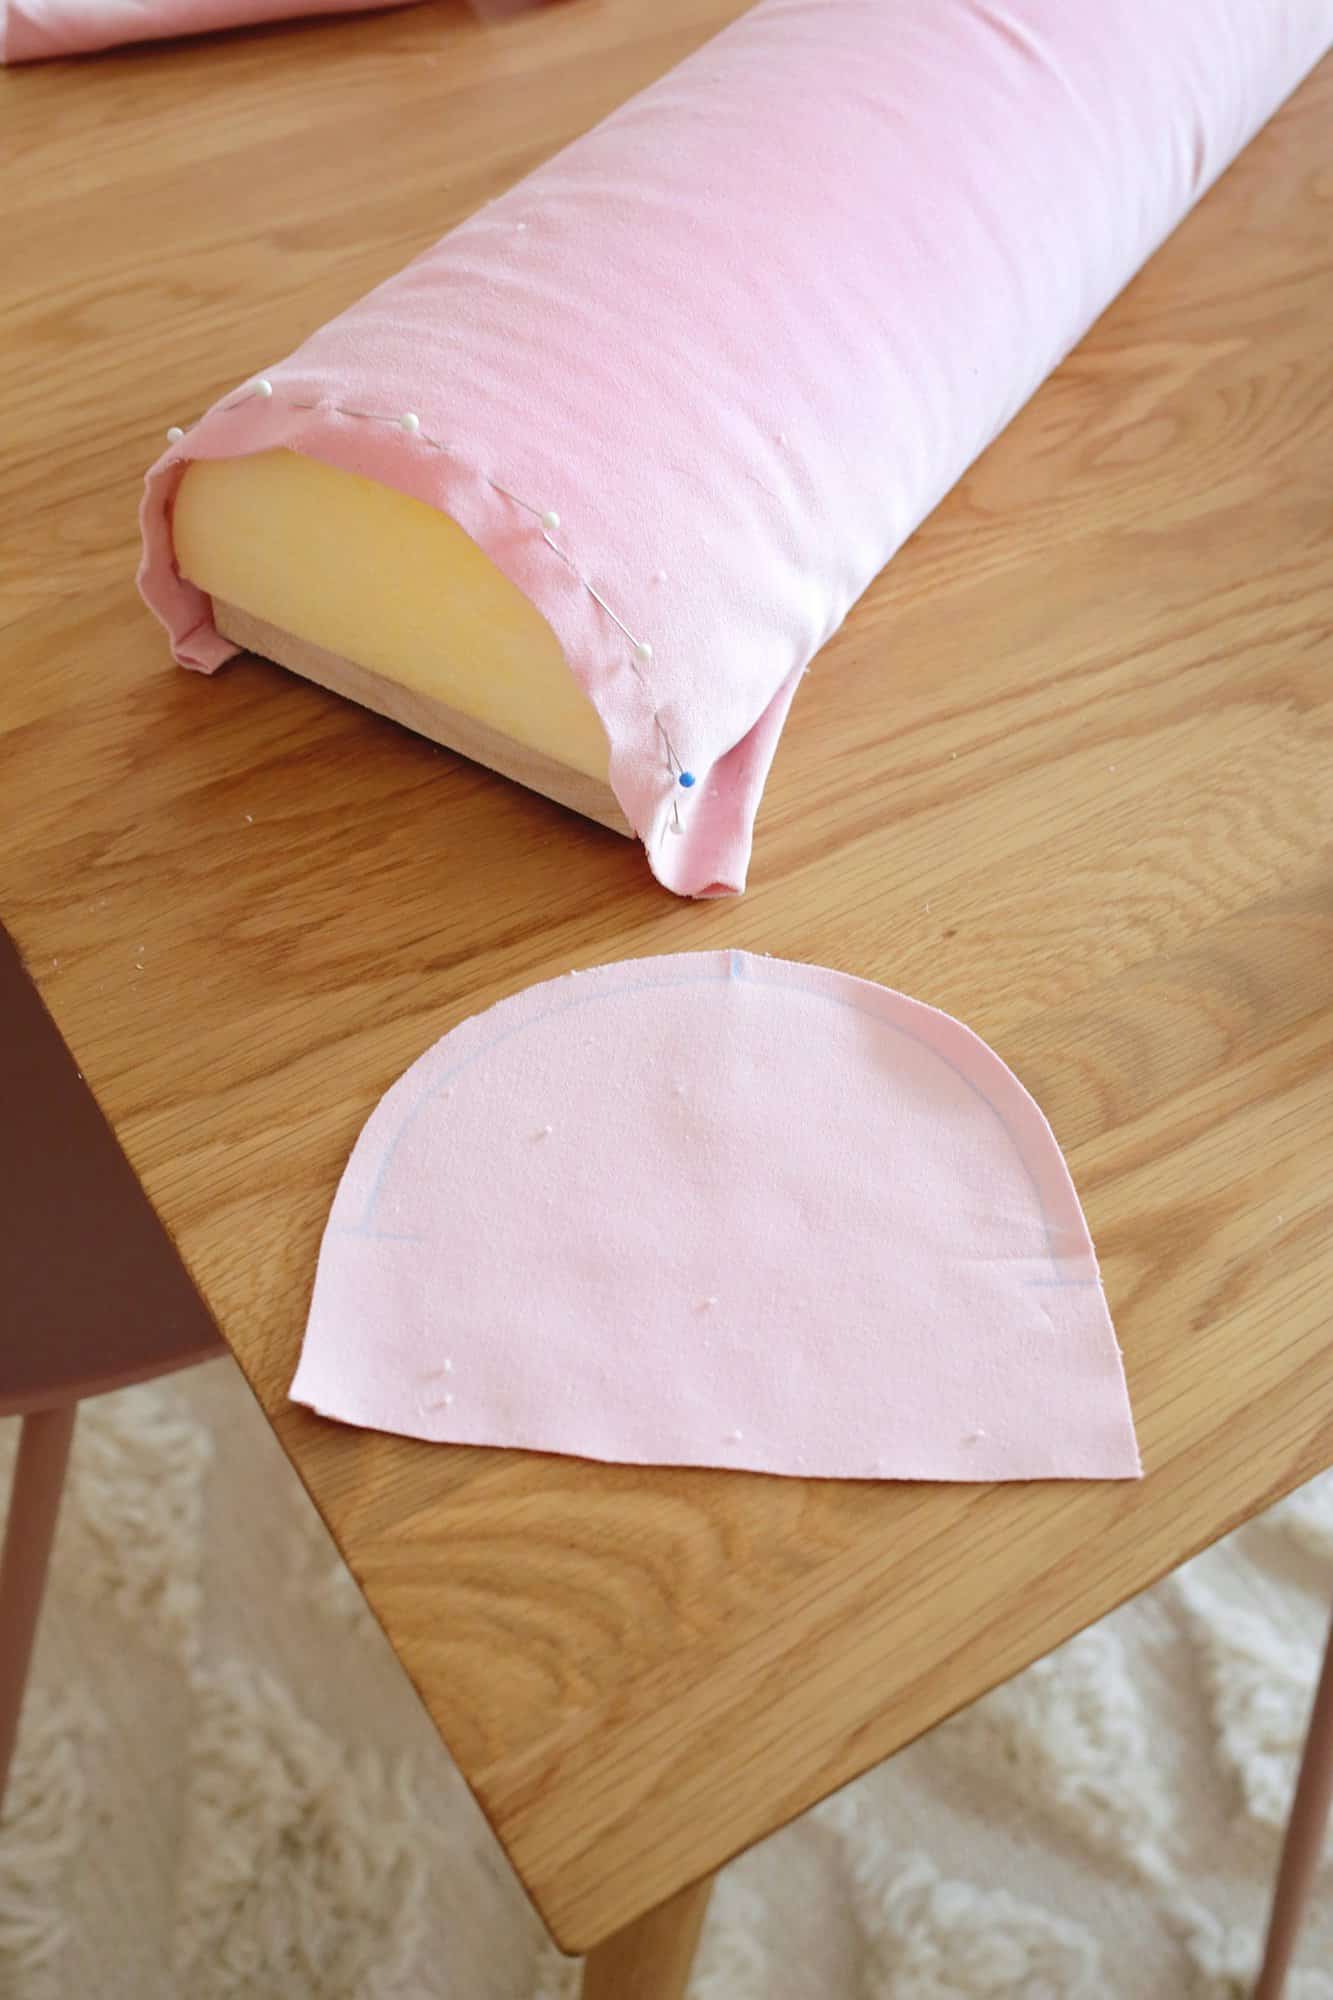
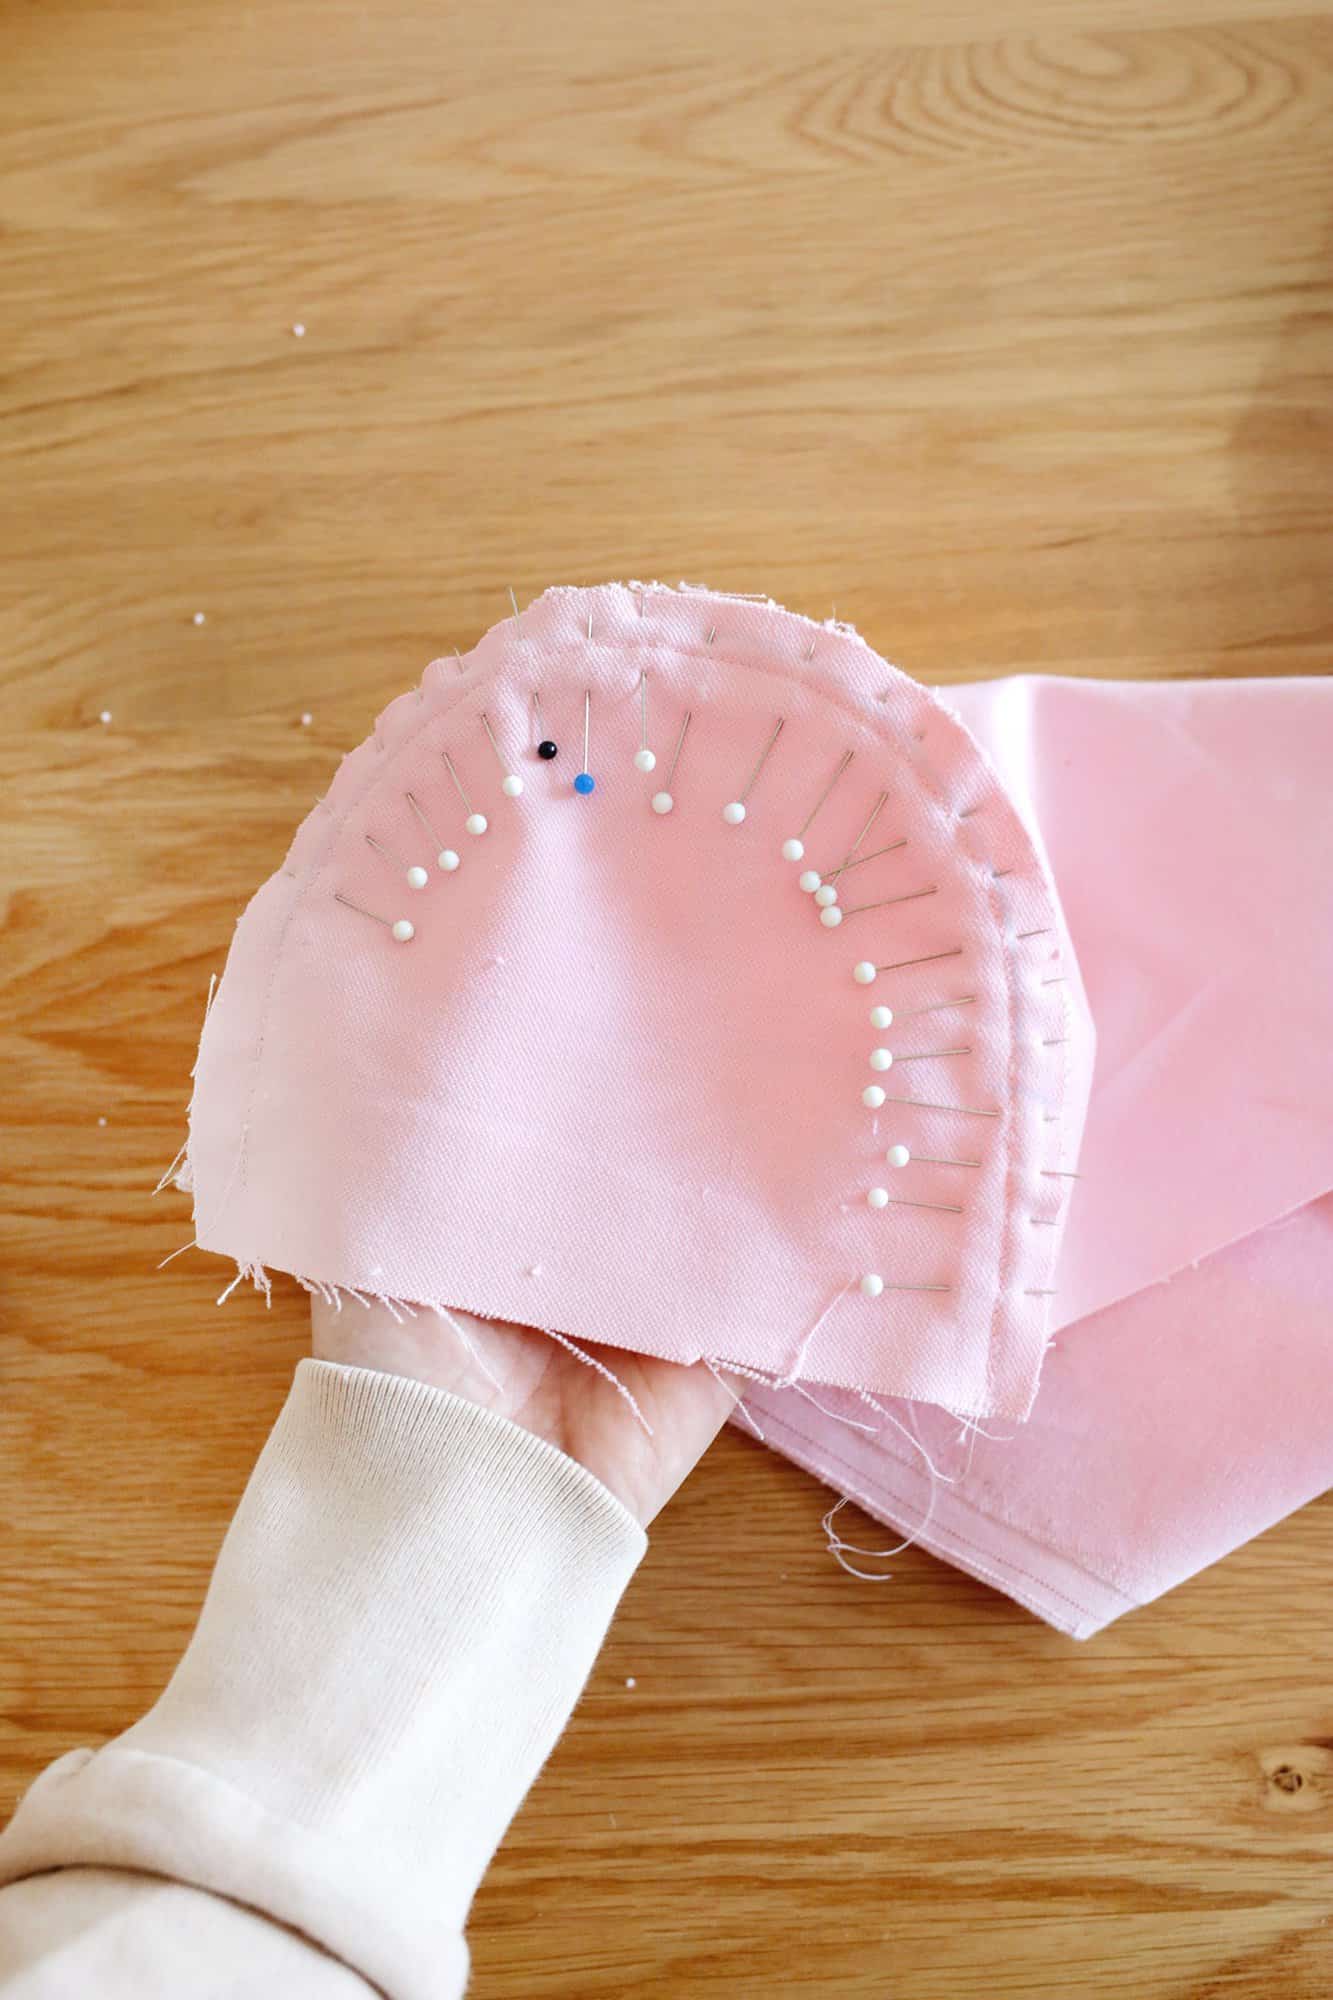
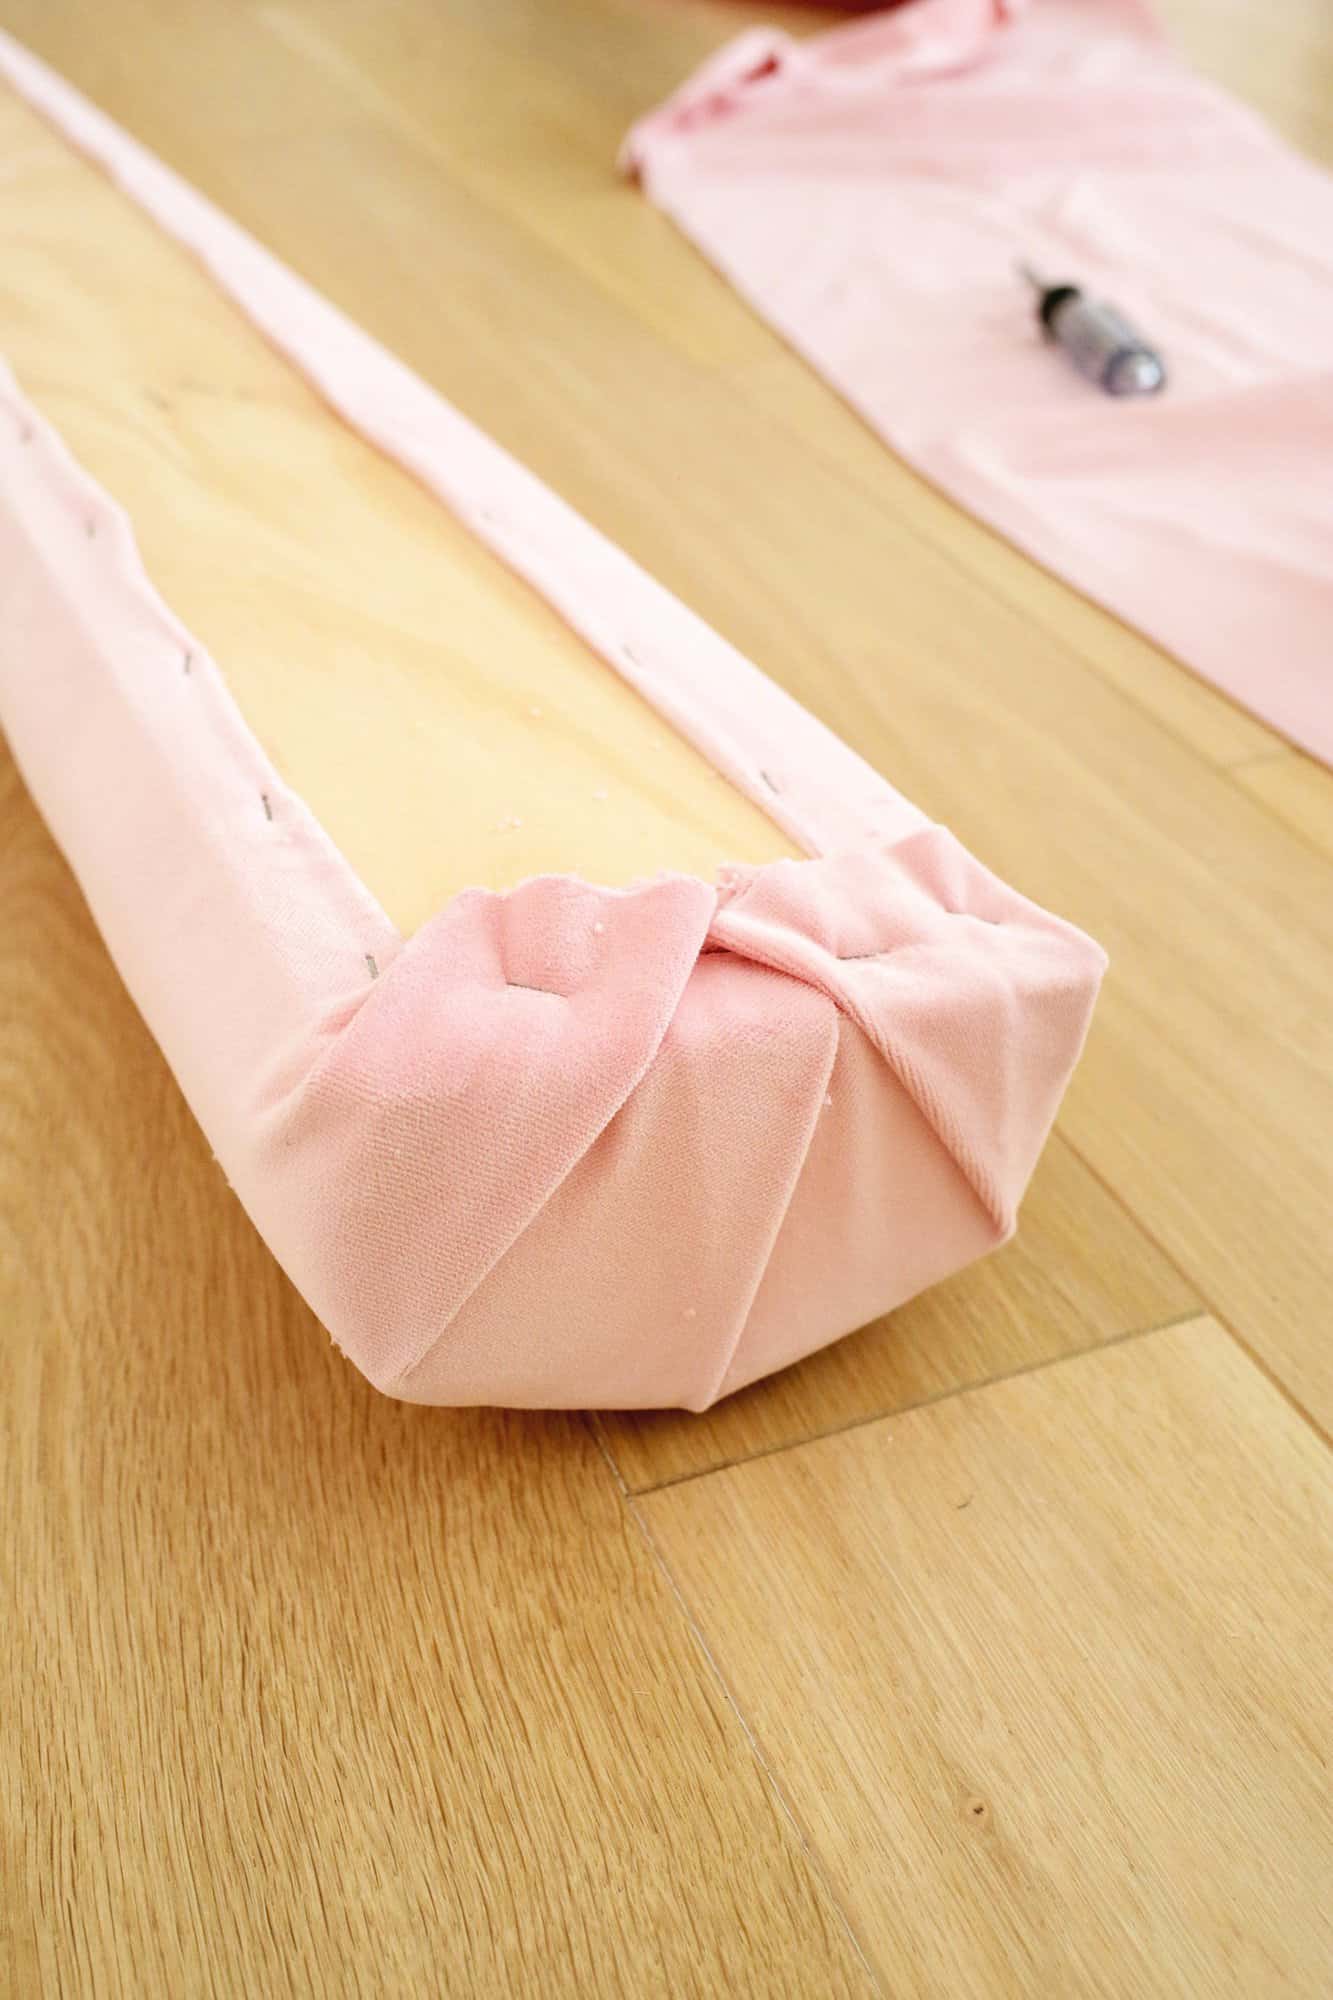
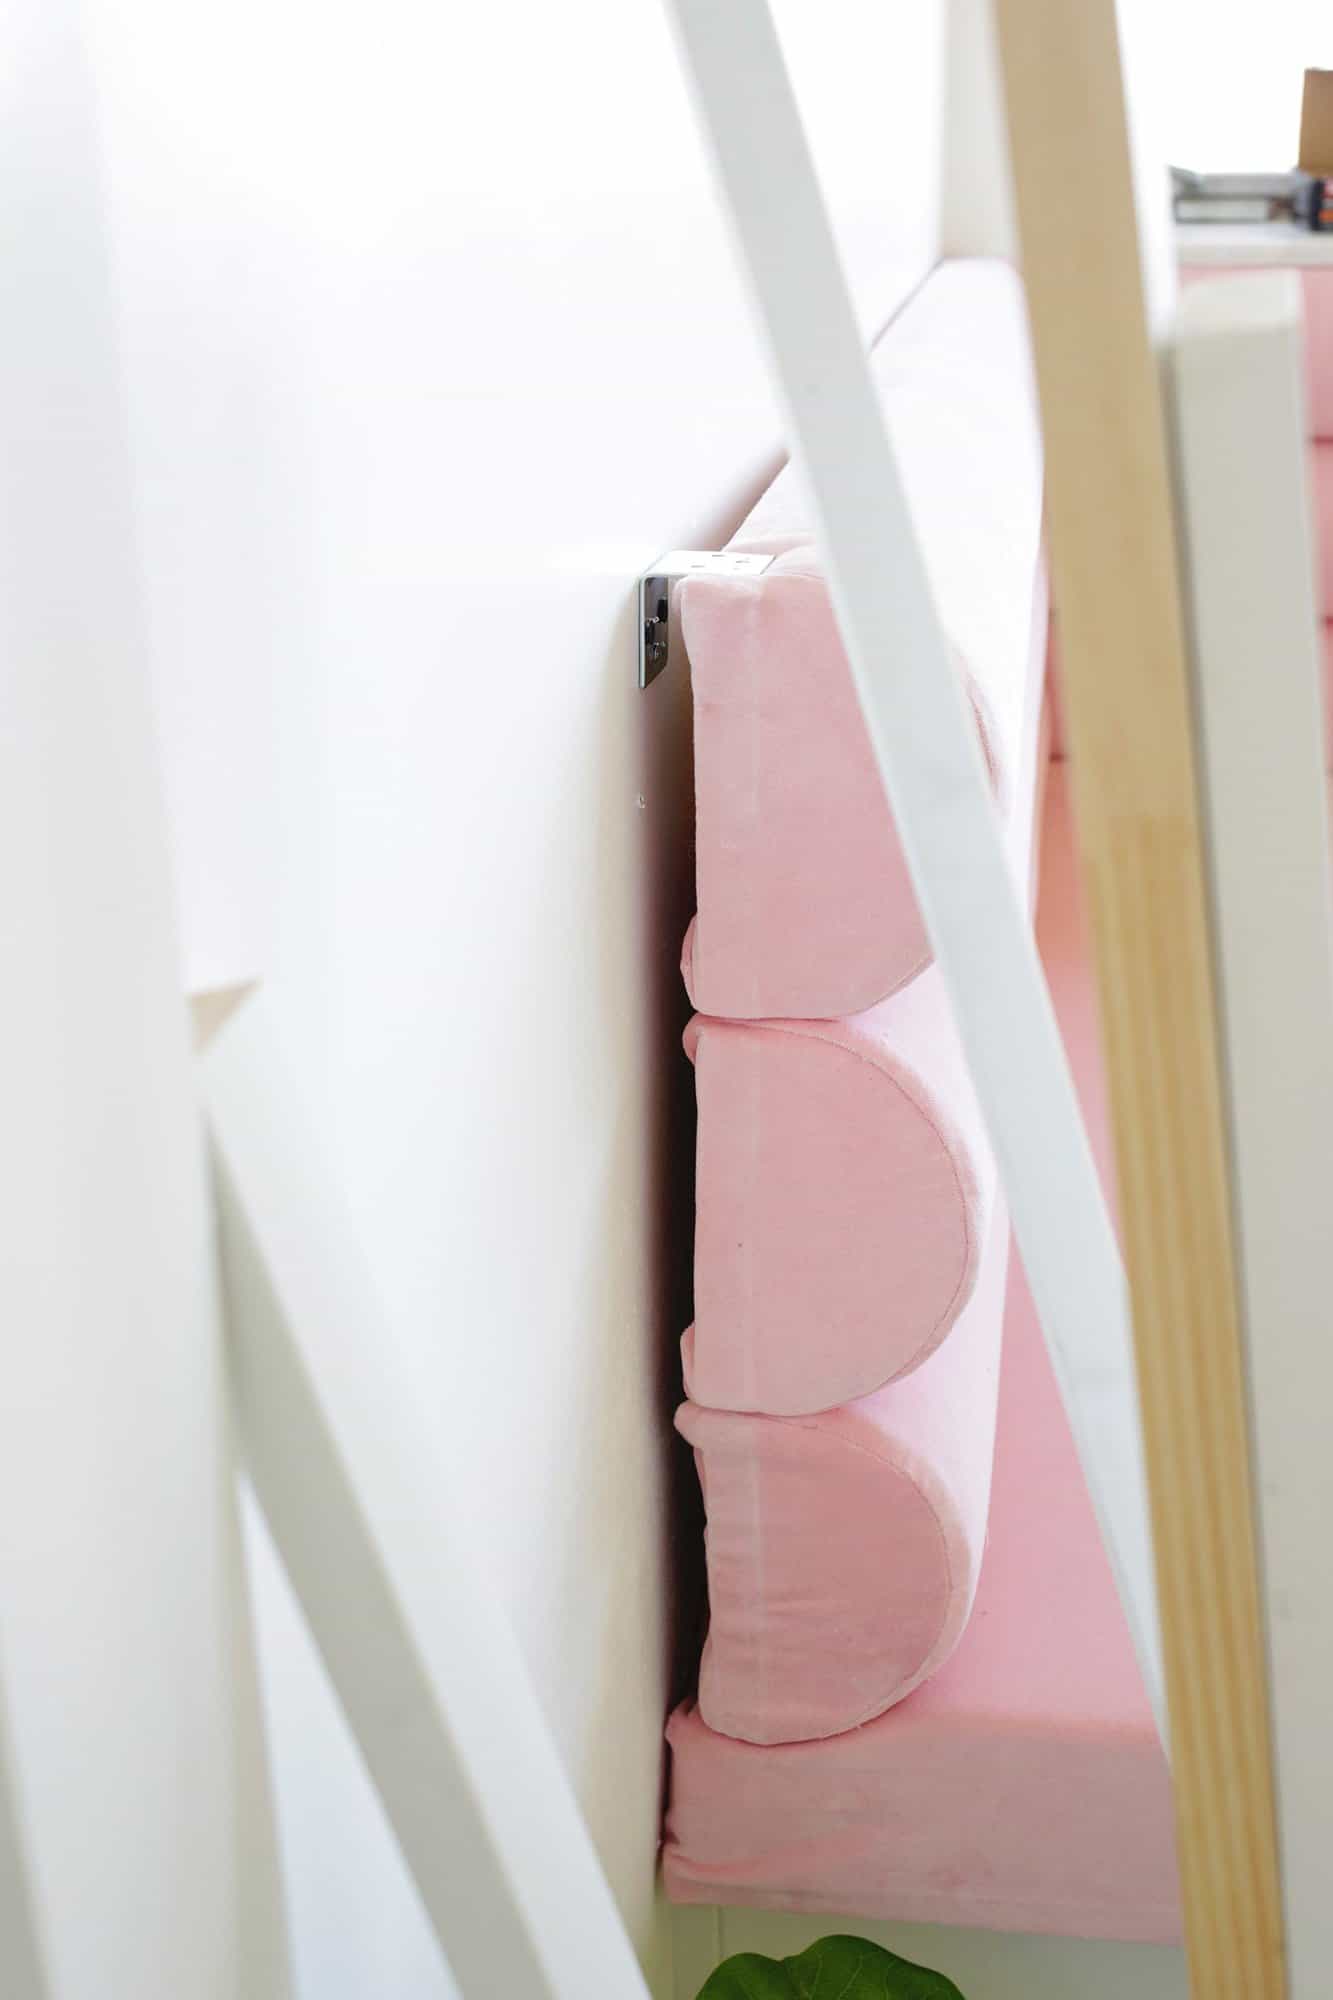
For my edges that were visible, I decided to sew those instead of fold and staple like above for a cleaner look. I made a half circle piece a little bigger than my foam bolster semi-circle and pinned and sewed that onto the edge of my fabric (right sides together when pinning and sewing).
I left extra fabric under the semi-circle when cutting the template so I had extra fabric to fold over and staple.
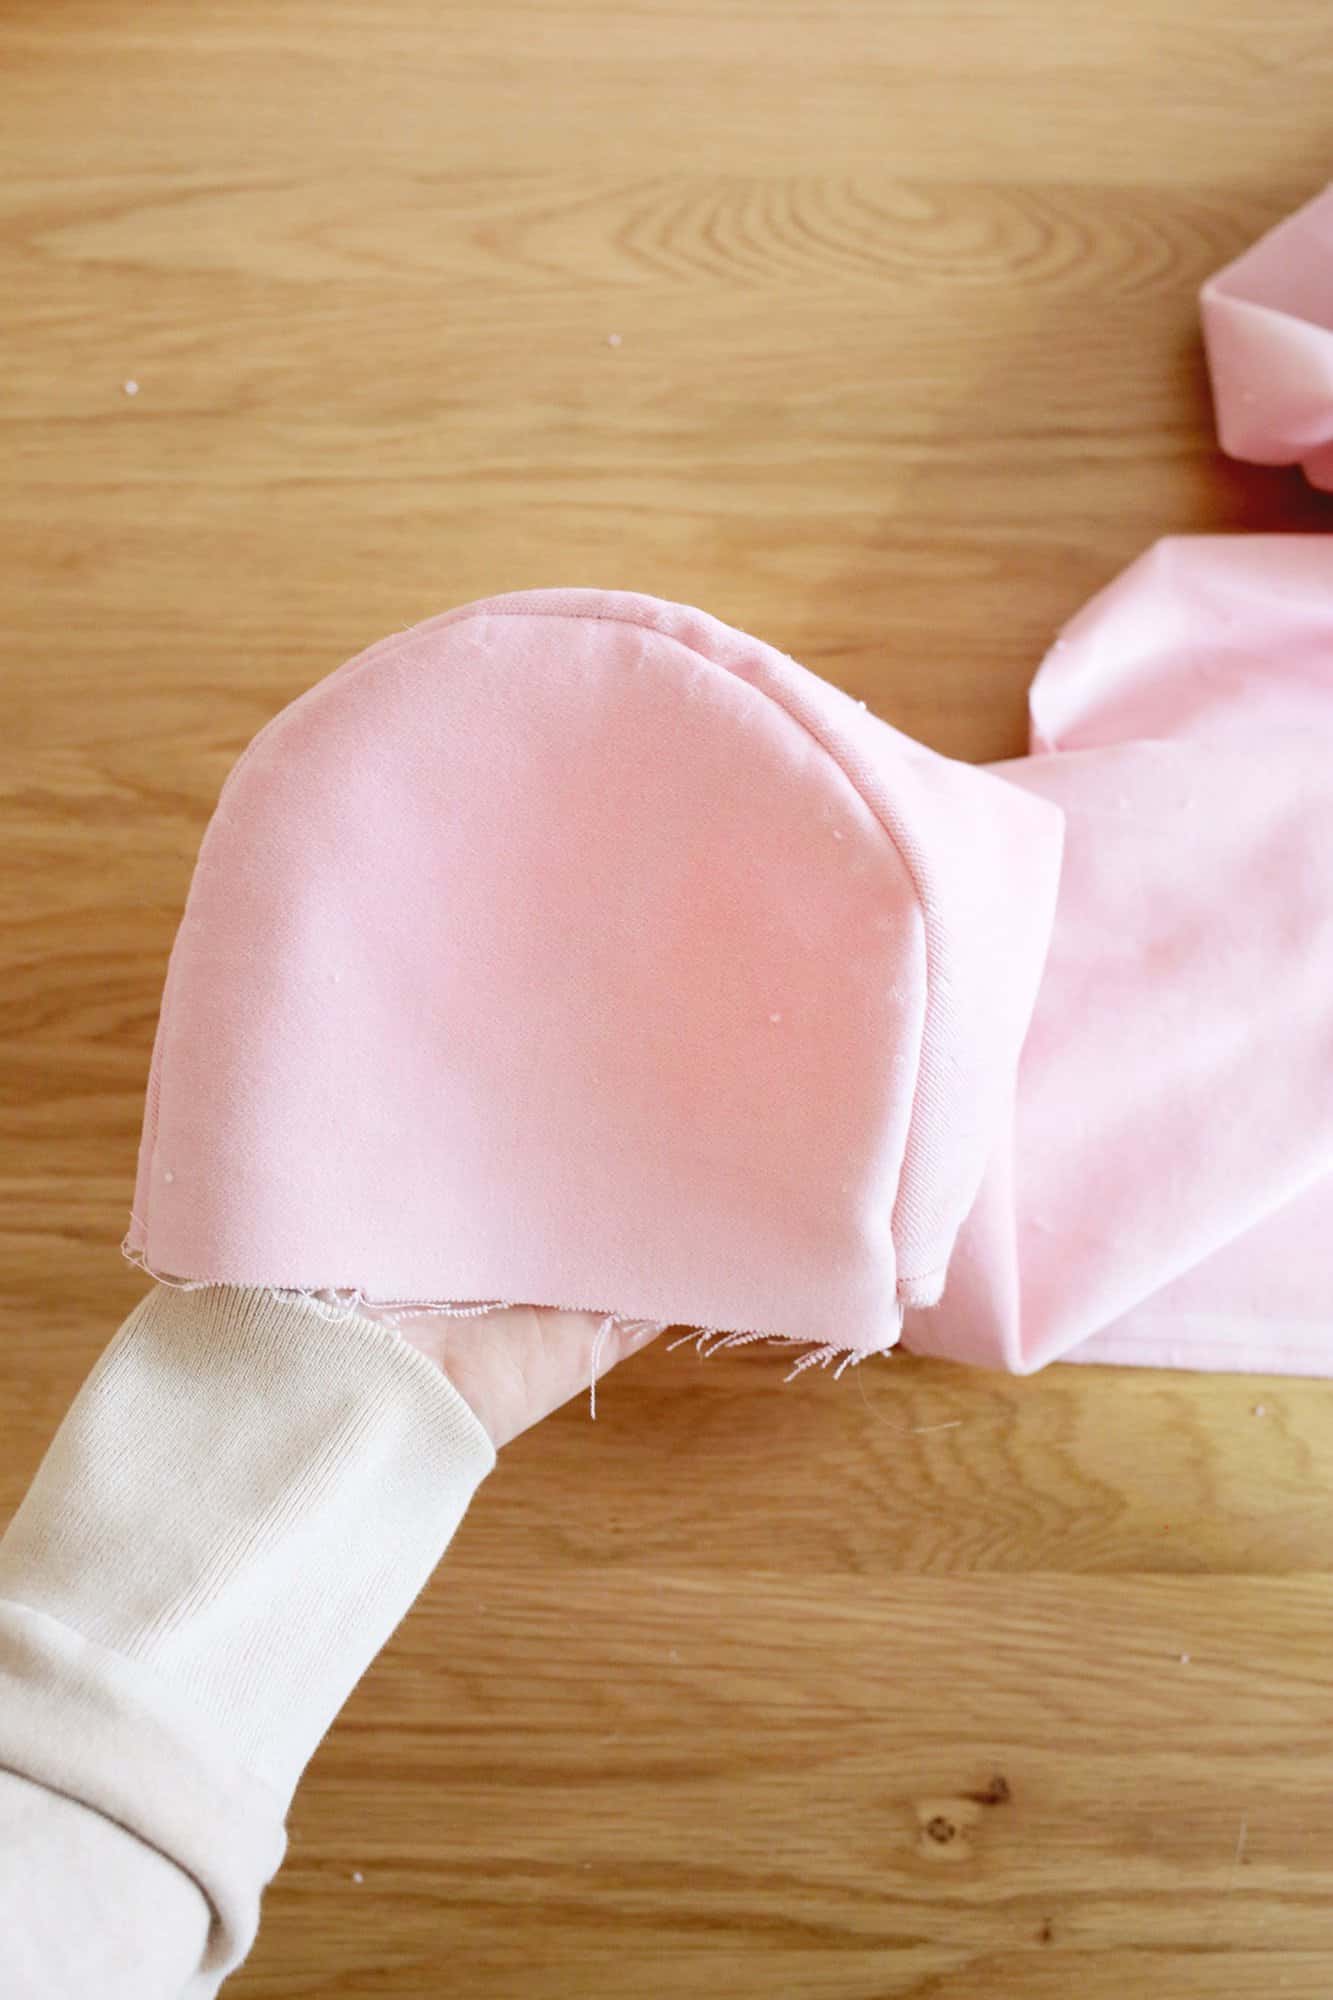
Once it was sewn and flipped right side out, it looked like it does above and I could fit that over the end of the foam. Then, I folded/stapled the extra fabric underneath for a cleaner end look.
You can do either method depending on your sewing skills, but if your ends are hidden, I would definitely do the faster folding/stapling method rather than sewing.
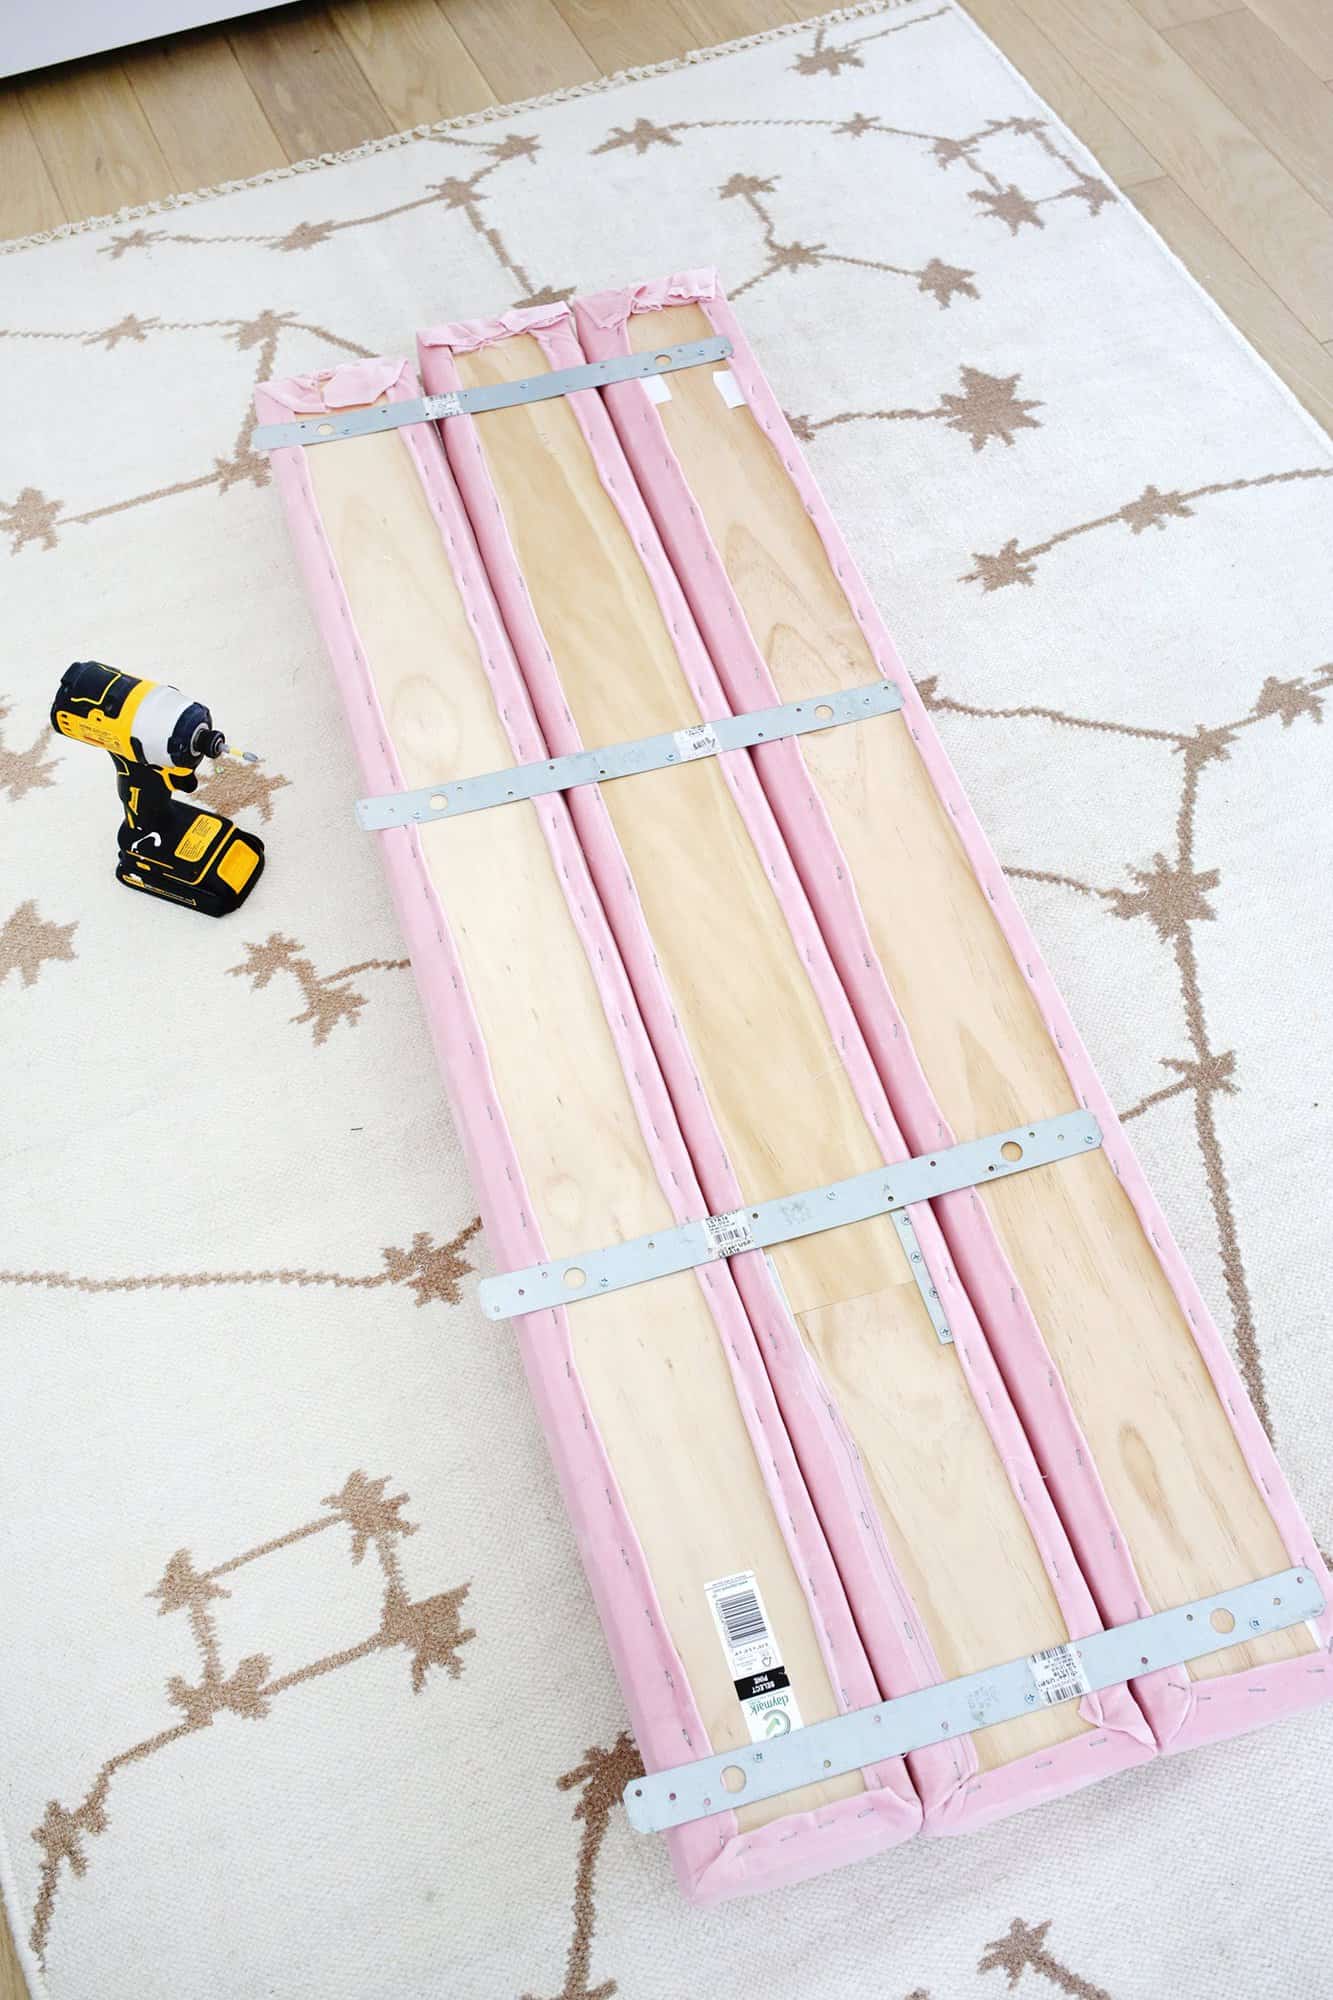
Attach the Back Sections Together: Once my three sections were covered in velvet, I used my metal strap ties to attach the sections together for each grouping of three.
I let the strap tie hang over at the bottom so I could screw that part into the wall to hold the bottom section in place.
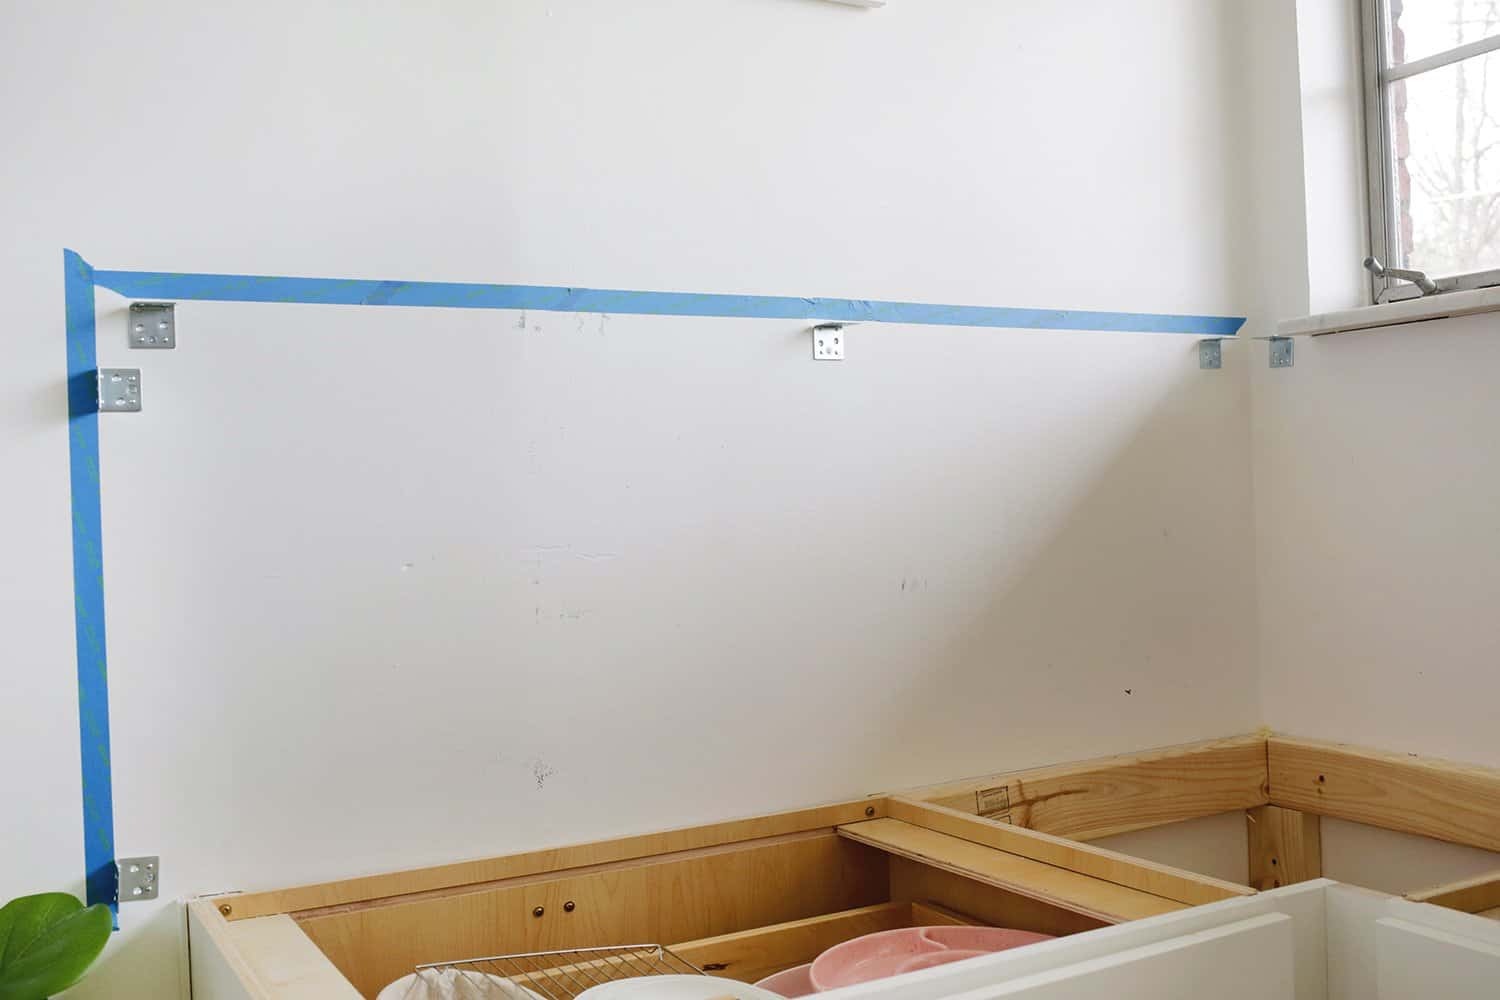
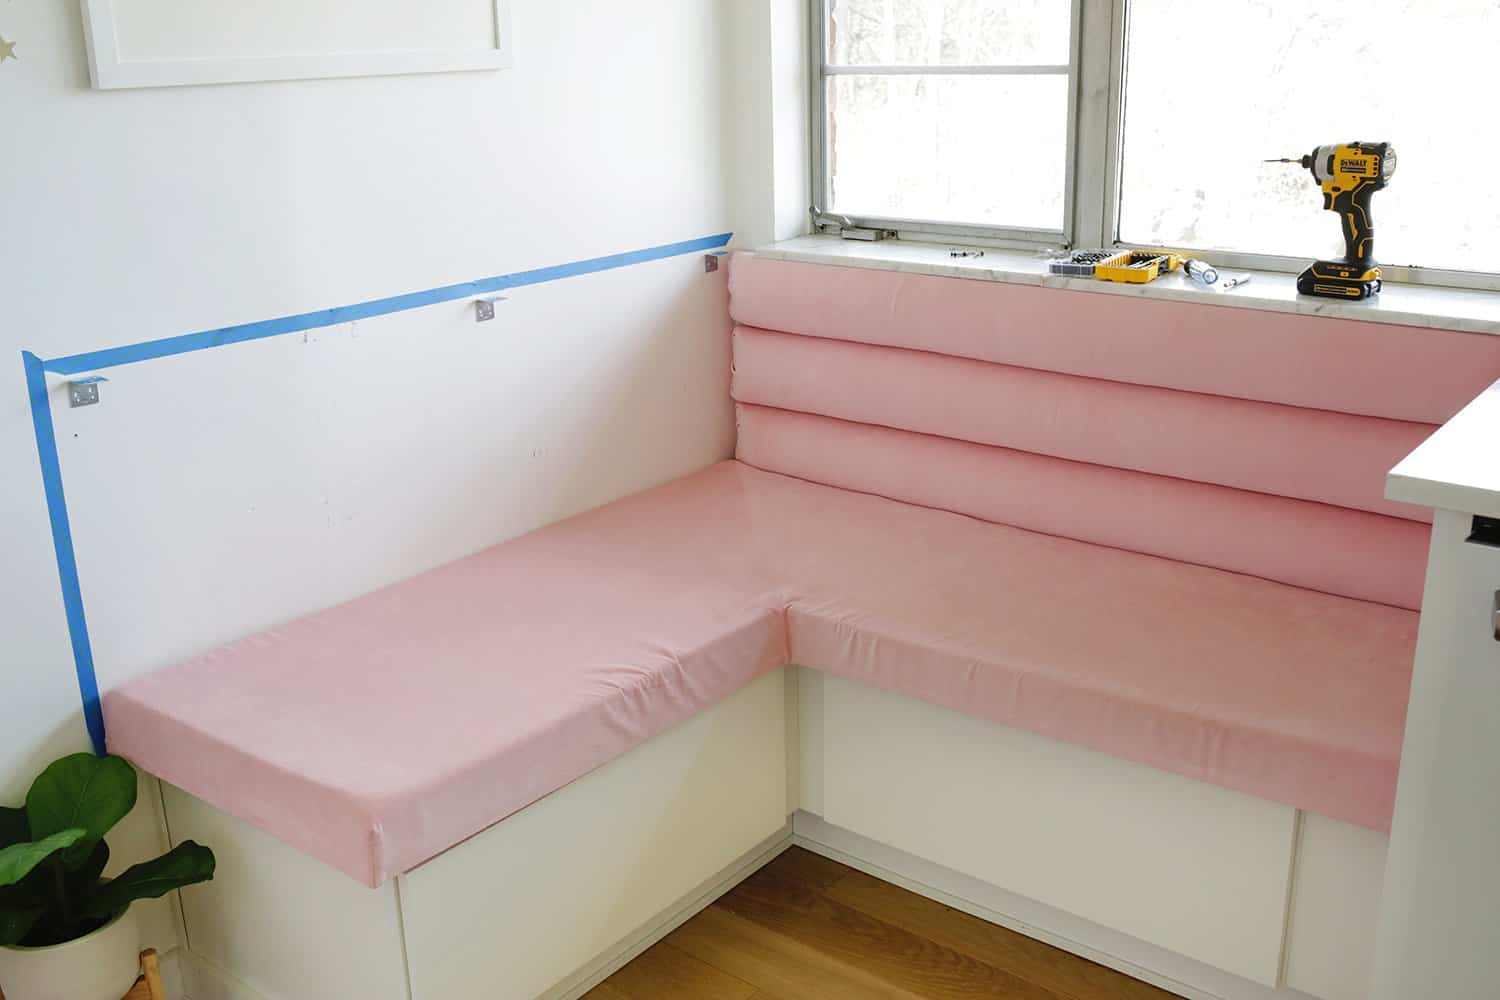
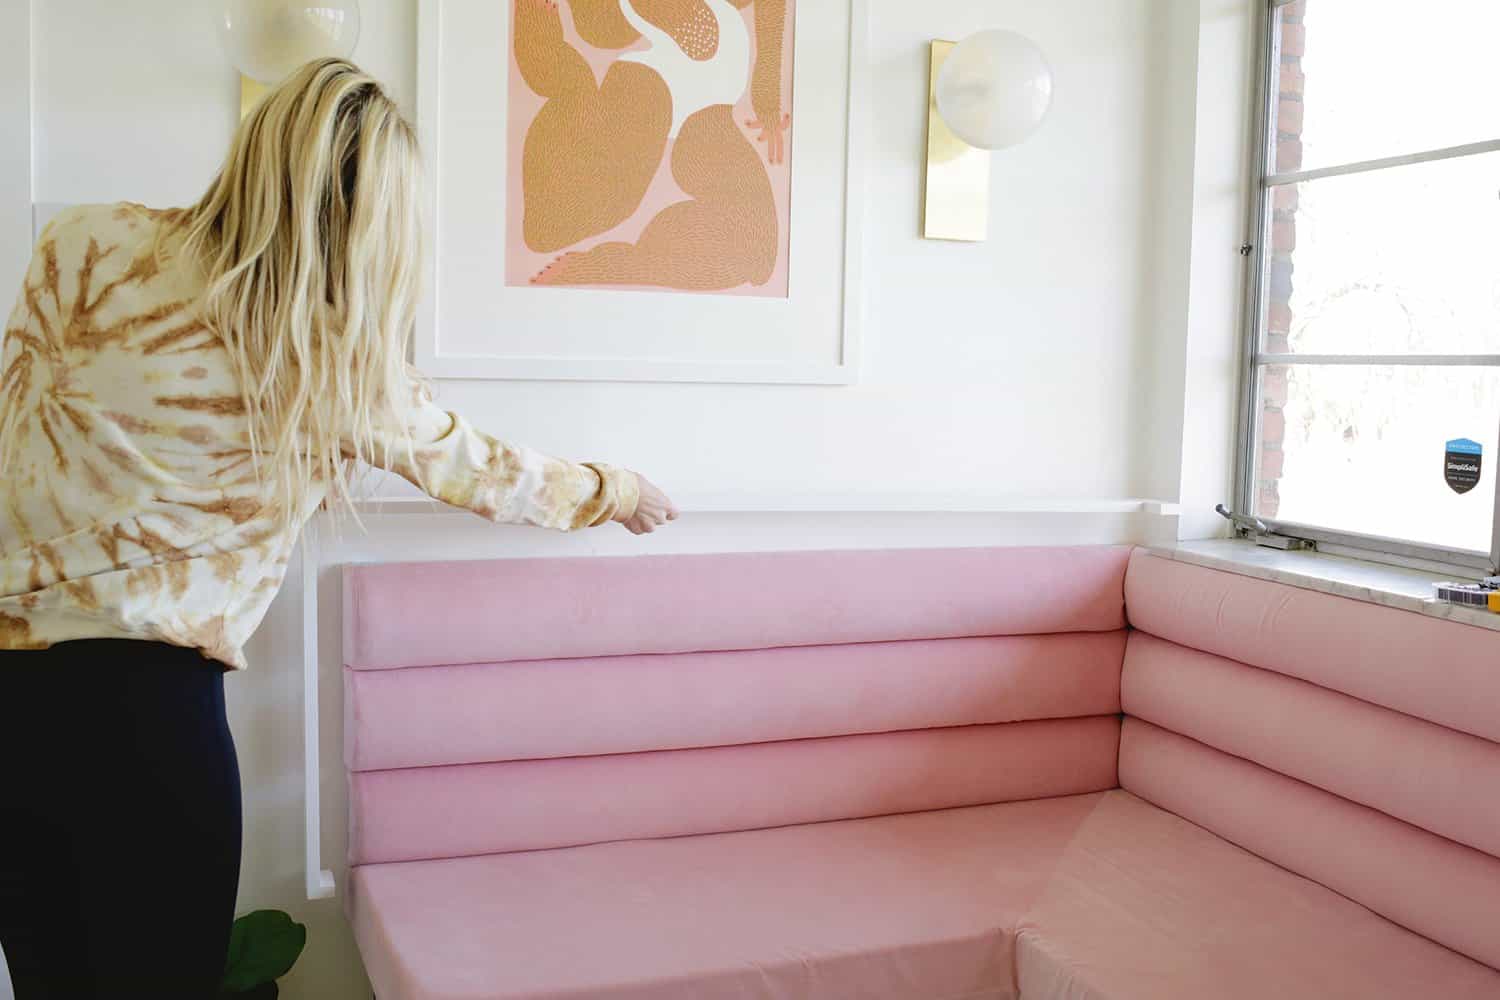
Prepare the Wall: Then I used painter’s tape to mark about where I wanted the top of the banquette section to hit (I was trying to make it even with the marble windowsill ledge on the right side of the banquette).
I put some L-shaped brackets there to hold the top of the banquette in place and give me something to attach my final wood trim to.
Attach Back Sections to Wall: It would be easiest to screw in the back sections first and then slide in your seat cushion, but I had to put my seat back in before the back right section. My kitchen counter was in the way of angling it back in properly after the back was on.
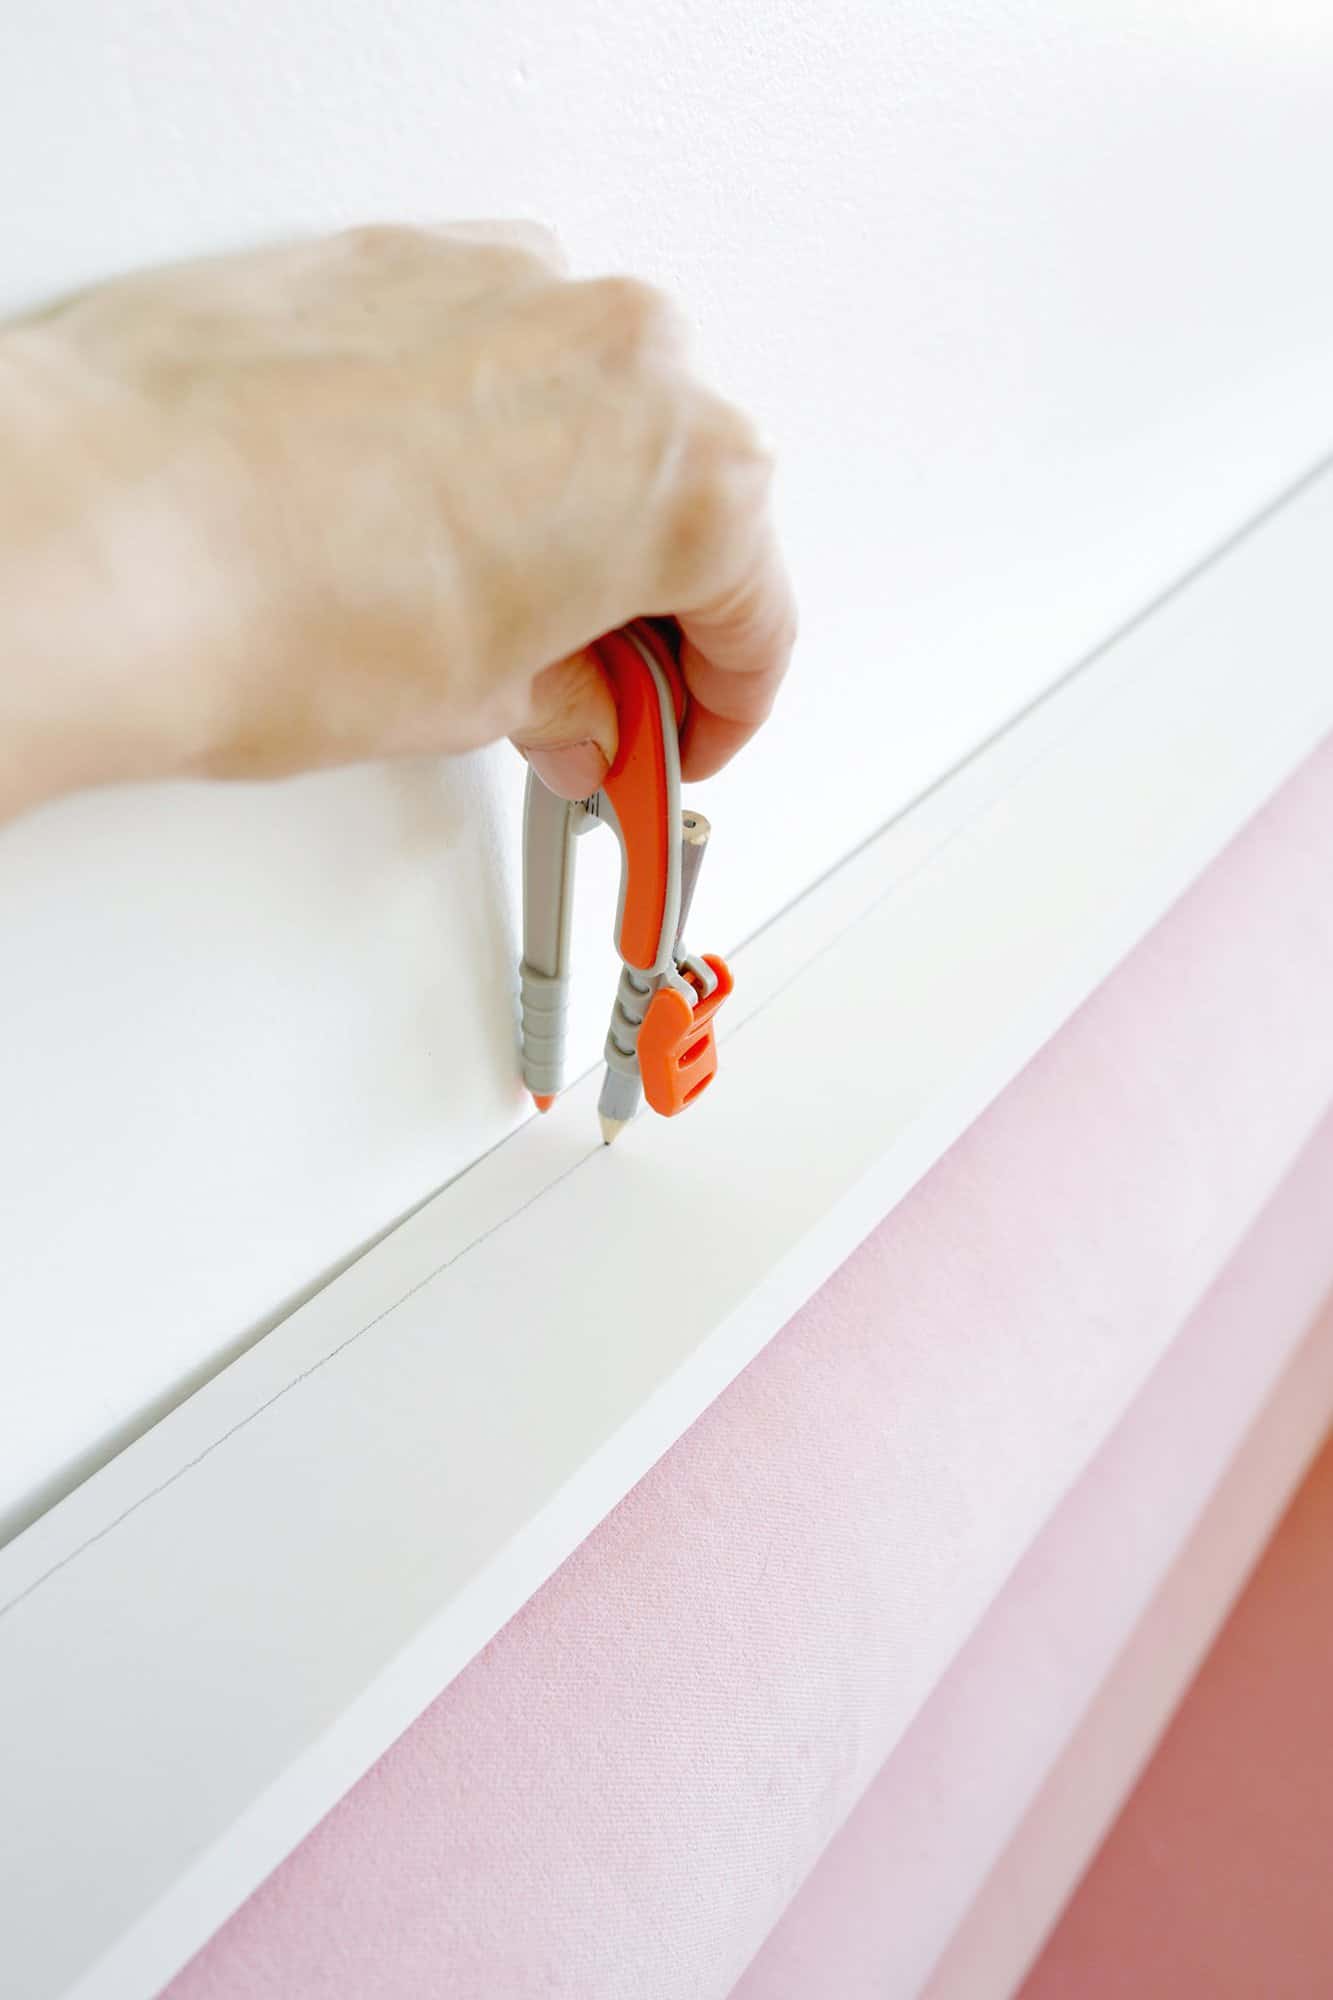
Add Wood Trim (optional): You can see that my back section is in and the top L-brackets are holding the top in place, but the walls in our older home are not exactly straight, so there was a gap where the wall curves inward quite a bit in that area.
Besides rebuilding the whole wall properly, my best option was to hide that gap with some wood trim that goes up the side of the banquette and follows the curve of the wall (and painted the same color as the wall) to help hide the issue.
I put a 4″ board on top of my banquette and used a compass that was fixed to the dimensions of the widest part of the gap to trace along the wall. Then, I scribed a line onto the wood of where I should cut it with my jig saw for a perfect fit.
This is a great video that shows you exactly how to do it with just a pencil or small block of wood.
Once I had the top board scribed, I could use my miter saw to cut the other pieces to fit the other gaps I wanted to cover, glued them together with wood glue, painted it white, and then installed it on top of the banquette brackets.
You could screw/nail it into the wood backing of the banquette sections or even glue it onto the metal brackets as well.
Note: If you don’t need to cover any wall gaps like I did, you can simply use construction adhesive to attach these panels to a wall or refer to Mandi’s banquette post if you are going from one side of the wall all the way to the other for best practices there.
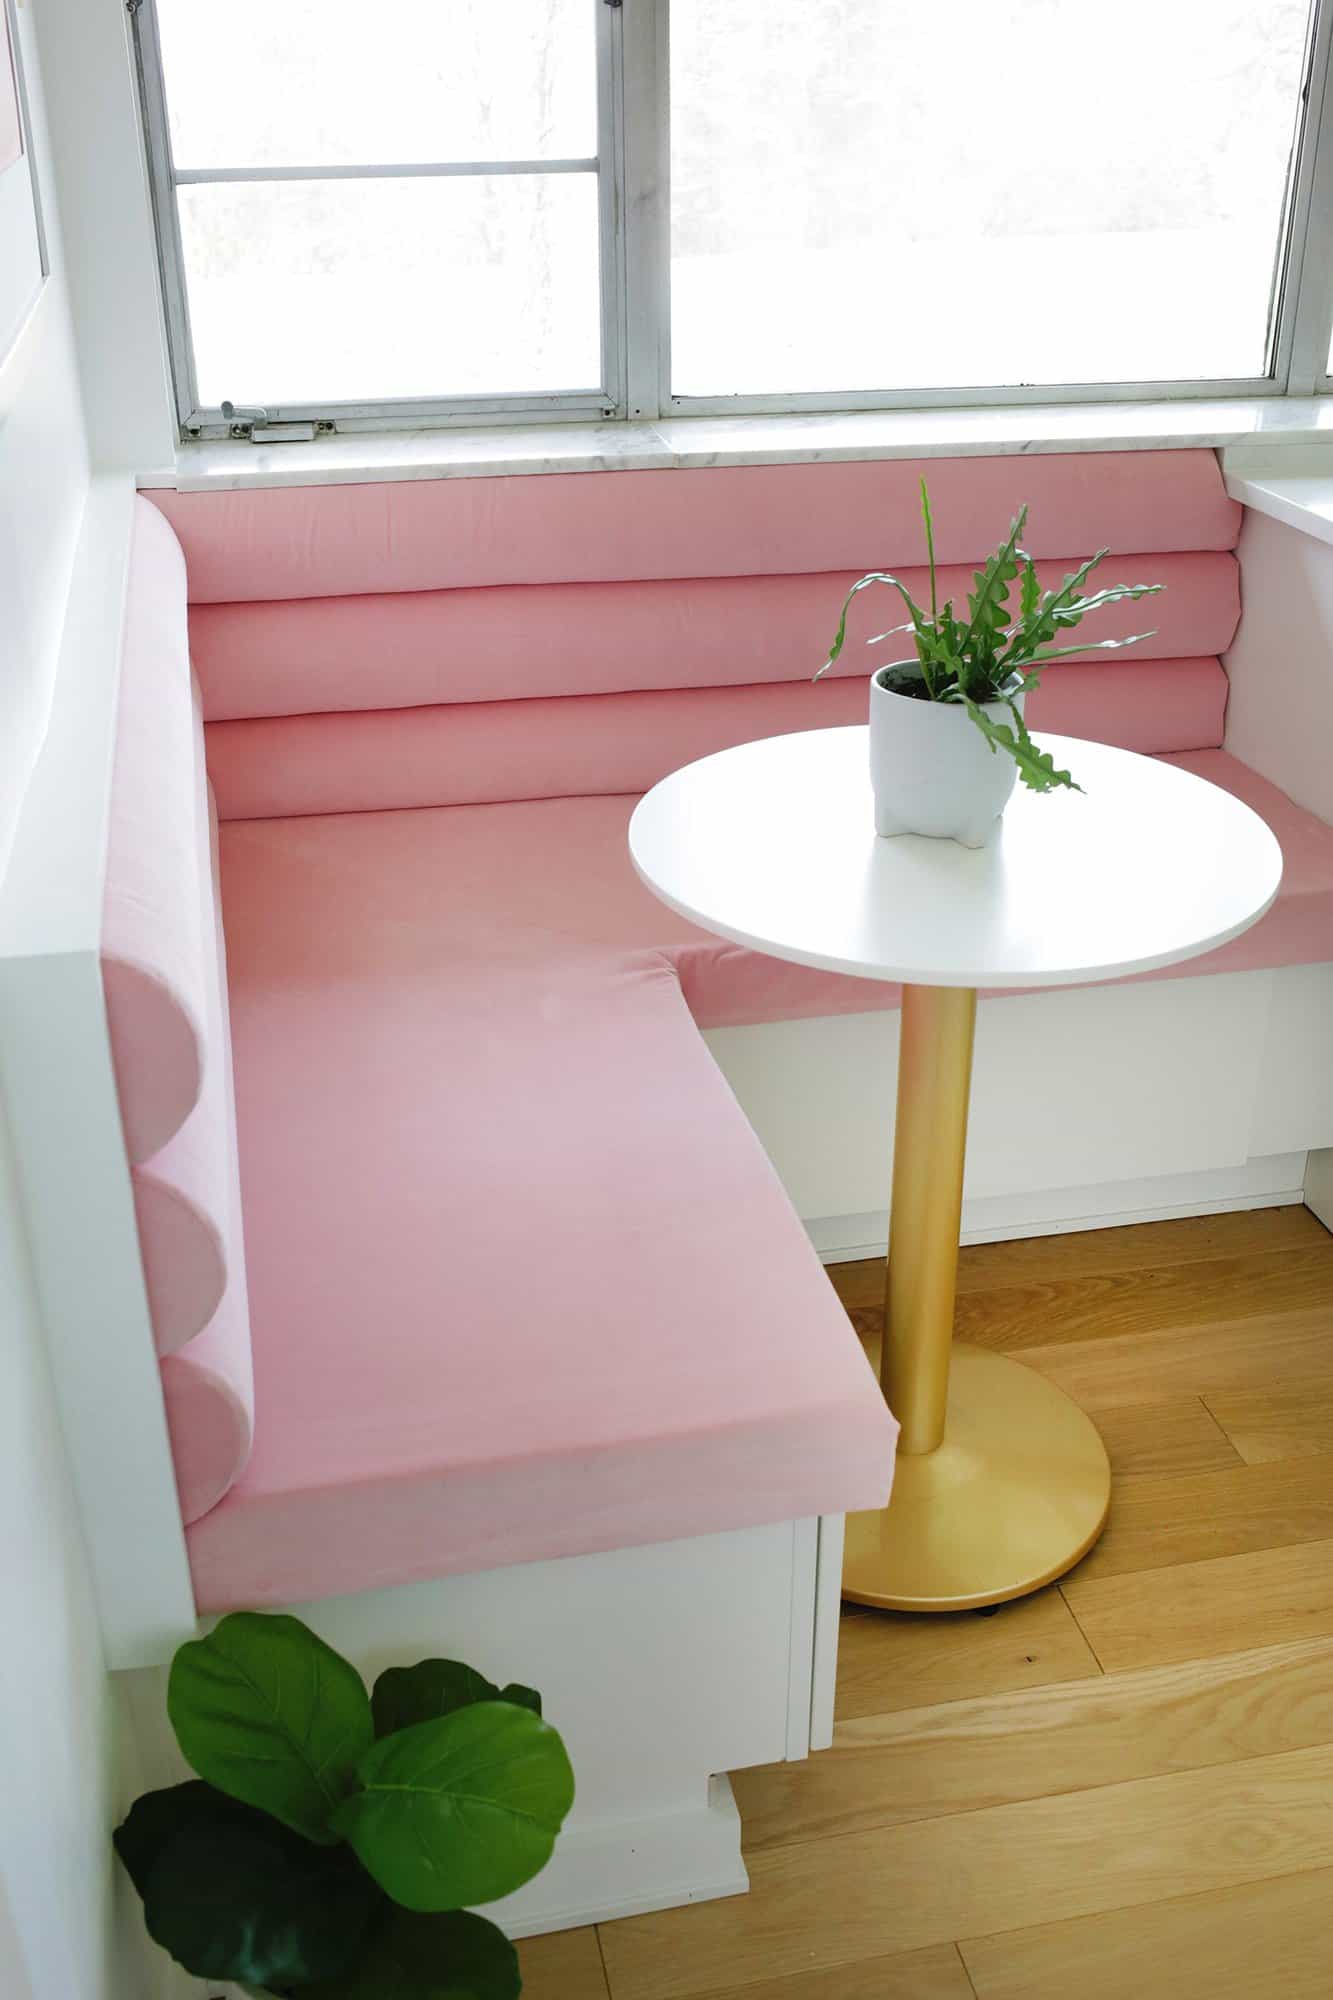
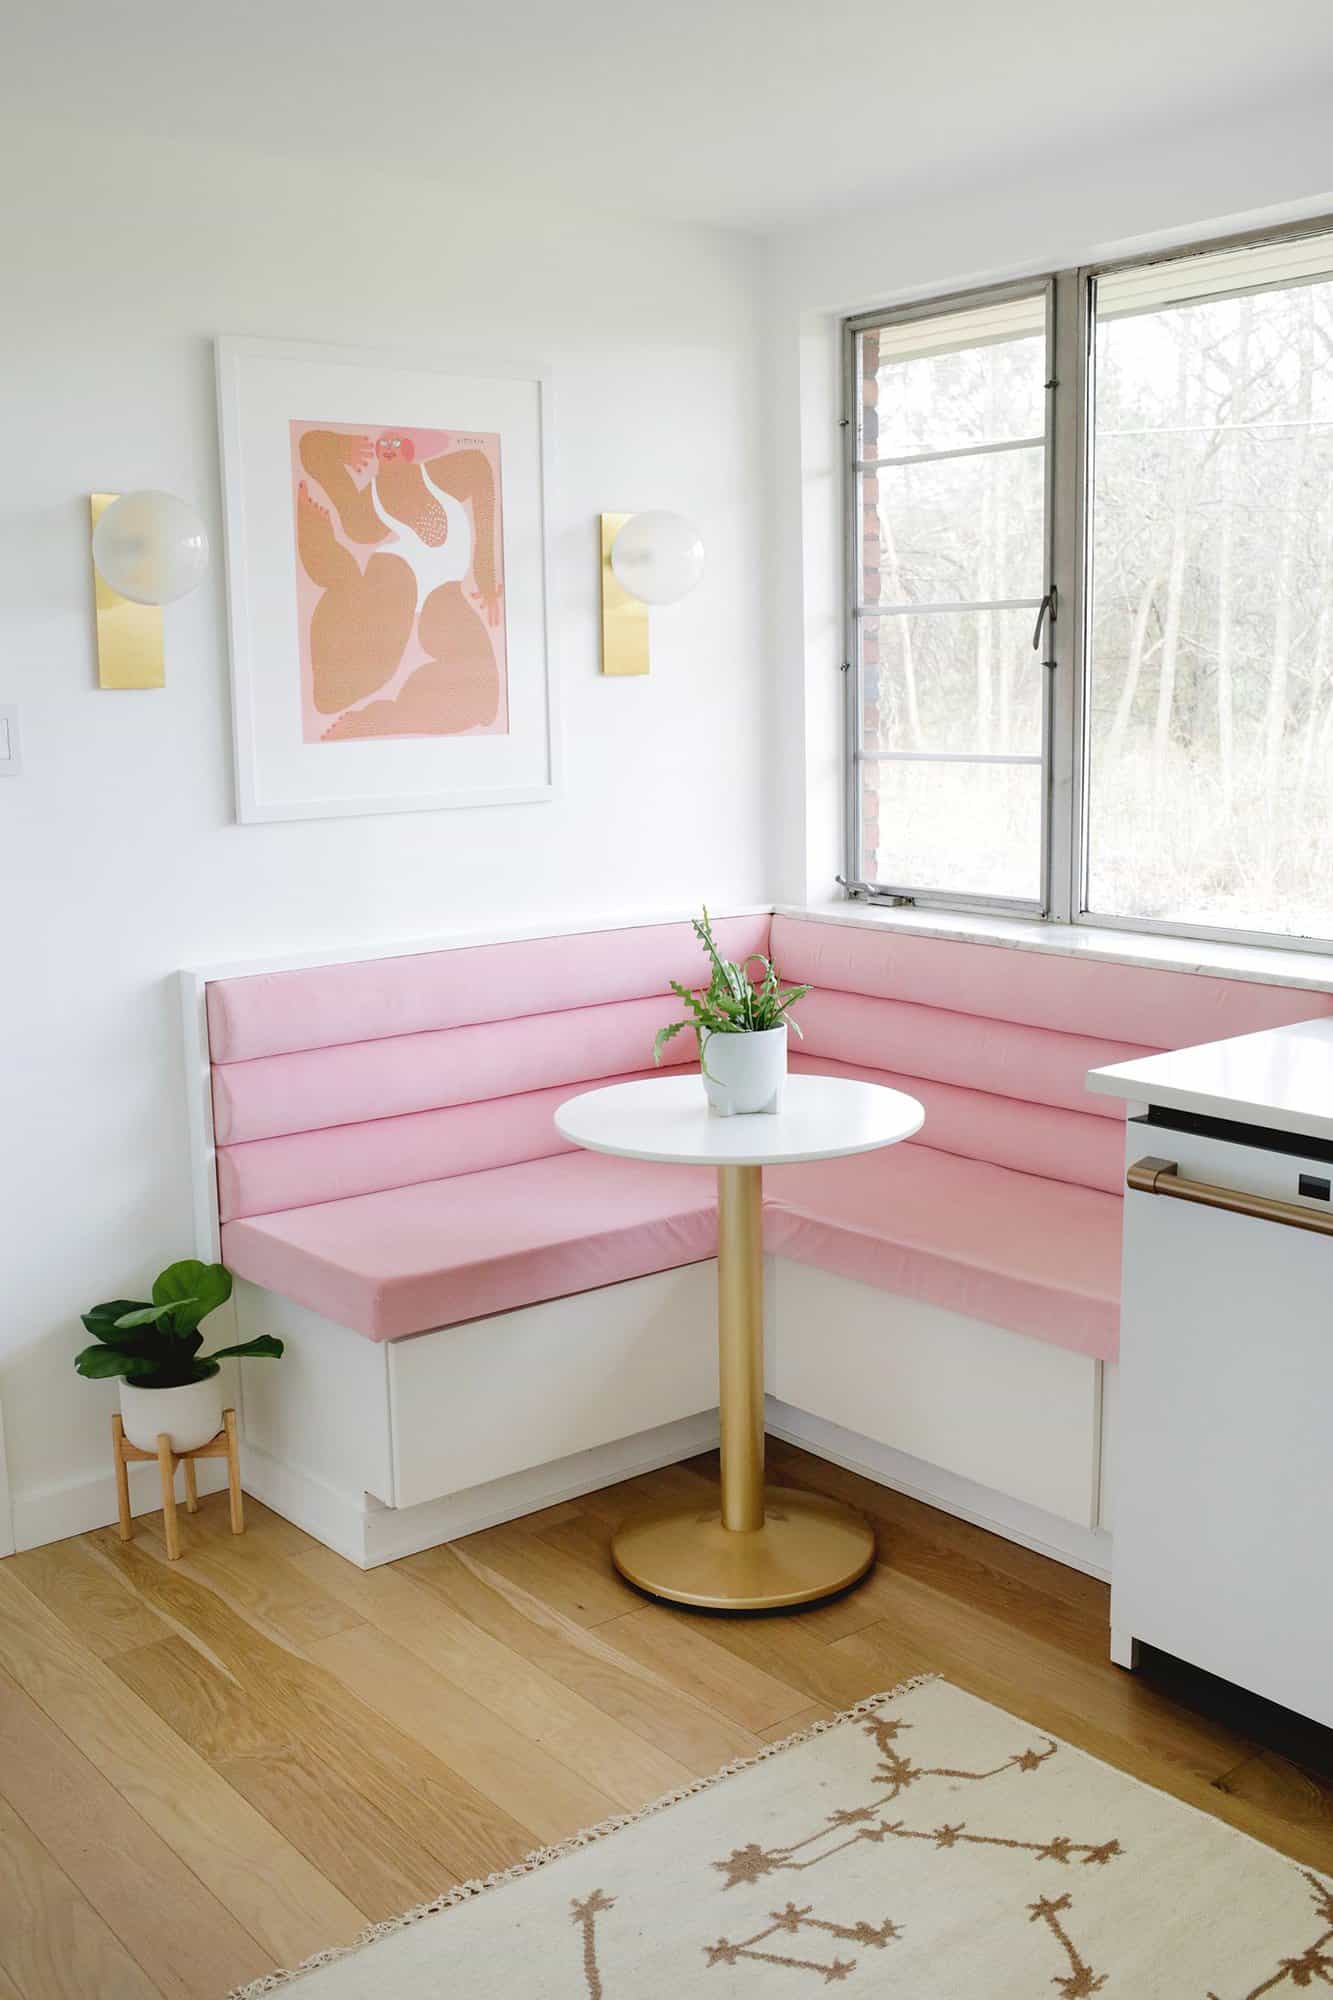
I will say that this was a marathon of a project for me and a lot of problem-solving with our particular space and the corner component, windowsill on one side, countertop edges in the way, and uneven walls.
The whole thing was dragged out for almost a year in between other projects in the area/kitchen, but I can’t tell you what a relief it is to have it done and it came out so beautiful that it really was worth all the work that went into it.
Just this morning my daughter was sitting on the banquette and coloring in her pjs, and it just gave a little shot of joy to my morning to see her there.
Hope this inspires you to make your own banquette or to go for a DIY project that will brighten up your home! xo. Laura
Love a good kitchen makeover? Check out these posts …
–How I Refreshed My Kitchen Cabinets In One Afternoon
–Holiday House Kitchen Before & After
–Laura’s Kitchen Tour (Part 2!)
–Elsie’s Kitchen Tour (Before & After)